Showing posts with label hats. Show all posts

Thursday, January 8, 2015

Trying (AGAIN!) to Get Organized

It's impossible to work on projects when you can't find anything. When all the components are somewhere in this mess but you can't find them anywhere. When you know you have that thing but damned if you can figure out where it's gotten to. Lately I've really been missing sewing, and it's hard since my patterns were really disorganized and my fabric stash was a mess. The last few days I've been working on getting that better organized. Hancock Fabrics had pattern boxes on clearance (interestingly, they more or less match the hat boxes I bought from them on clearance a couple years ago), so I bought a bunch of them to organize my pattern library. It's not huge by any definition, but I left myself room to expand as my ability increases. So now I can lay hands on patterns quickly and easily, and ok, fine, but that still meant my fabric stash was a horrid mess. I didn't even know what all I had, since some of it was given to me by Mom, and some of it I'd had for ages.

I decided the most sensible thing was to sort out the things I knew I had projects for first. This fabric is to be made with this pattern (with a slip of paper with the pattern number and intended view), etc. etc... I have a bin-full of skirts and hats and a bag (with a matching hat). I'm not even sure how many; I didn't count, and honestly, I'm a little afraid to. The bag on top is material for a skirt for my daughter. Not in the bin are bags with fabric to make a skirt for a friend of mine, and two more for me. I have to remeasure her, and myself, since we've both lost weight, and I want to make sure they fit properly!


In addition to all of that well-intentioned and organized insanity, I also went through the bins of fabric under the basement stairs, so I could get a better handle on what I had, so I knew what I could play with once I finished the projects in the bin. [insert hysterical laughter here] I decided to sort by color, and grabbed a bunch of empty milk crates (they were handy) and lined them up on the floor and started sorting things into them. I quickly realized I had way more purple than would fit into a crate, so I dumped out a large bin and put the purple fabric in that, and pink soon followed. (I was astounded at the volume of pink fabric I had, truly!) Once I got the colors sorted, I started sorting within the color by fabric type, into gallon-sized zip-top bags, e.g.: sheer fabrics, satins, lining fabrics, velveteen, velour/stretch velvet, cotton, etc. So if I want purple velveteen, I can find purple velveteen. I only managed to finish this with the purple, not yet with the pink. I ran out of good storage options for the other colors, so I'm not sure what I'm going to do next, other than watch the sale ads and see who wants to sell me exactly what I want the cheapest. I did managed to separate out a bunch of small-patterned and juvenile cotton prints to use for doll clothes, and put those in a a drawer neatly labeled "Fabric for Doll Clothes."

* * *

I can't remember writing a specific post about my sketchbook, and looking back through old posts, don't find one now... Anyway, a while back, I had the idea that if I used a sketchbook and sort of "downloaded" my brain onto those pages, I'd sleep better, because the ideas would be out of my head and on paper. It only sort of worked. Putting down an idea that's nagging me leaves room for new ones, so some nights I still don't sleep well. I've had to get out of bed to find paper, prompting my husband to suggest leaving a sketchpad by the bed.  I had to draw a hat idea on a paper napkin in the car because I couldn't find paper and I had to sketch it right now, which led to us going on a quest to find a small sketchpad I can carry on my person at all times.

Also? I hate sketching with a pen.

With my reawakened millinery passion, I thought it might make more sense if I kept a separate sketchbook with hat stuff in there. That way I could also include images that inspire me, so that when I'm not in front of my computer (it happens, occasionally), I still have those visuals. I also included a little pocket with images of all the hat patterns I have so that I can reference those easily when I'm sketching or looking for design ideas.

I have transferred the hat ideas from my "main" sketchbook to the hats sketchbook, and have started adding new ideas. I haven't added the napkin sketch; I'm pretty sure I can do a better job with pencil and a decent reference photo.

The good news is, that even if I complete all my projects in that bin (yeeeaaahhhh... that's gonna happen soon), I have plenty of fabric and ideas to keep me busy for the foreseeable future. All my husband has to do is throw some food down in the basement once in a while, and I'll be fine.

Wednesday, January 8, 2014

A Year in Hats

I started making hats at the end of December. Then in January, this happened:
I had a crazy thought this morning, before the caffeine hit my bloodstream: Wouldn't it be awesome to make a hat a day? Then I realized how insane that would be; 365 hats?! Even if I gave a bunch away, what it the hell would I do with them all? OK, hat a week, then, my idiot brain says. No -- 52 hats is still unmanageable. Fine, how about one a month? Fine. Fine. OK! (Ahem... everyone has conversations with themselves, right..?)
This post is the chronicle of hats, with new and improved photos (for most of them) and links to the posts and/or tutorials where applicable.

The Prequel (Dec. '12)

Month One (Jan. '13)


Month Two (Feb. '13)


Month Three (Mar. '13)
  • (Not So) Quickie Beret (reversible)
  • March's Hat: Flowers (beret)
  • refinished old berets 
  • Recycled Sweater Beret (painful lesson learned: some hats look like dog toys to a dog)
  • Ombre Sweater Hat (beret, sort of)
  • DC pieced beret 
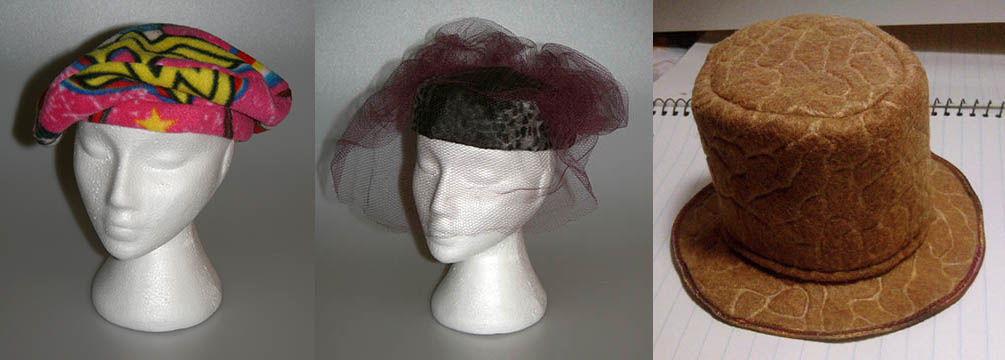
  • Wonder Woman berets (2)
  • oval "fur" pillbox (not satisfied with this one, and will be reworking it)
  • craft felt mini top hat (using a very modified version of this pattern)
  • recycled knit shirt berets (4)
  • felted wool sweater beret (unfinished)
  • dragon hat (pattern from Fleece Fun) -- sadly, I don't seem to have a photo of this, and I gave it away


Month Four (Apr. '13)

[cue crickets chirping]

Month Nine (Sept. '13)


Month Ten (Oct. '13) 

Thirteen months later, the number of hats made ended up being... 34! (I'm not counting the modifications I made to the berets already had. Those were made for me by my mother years ago, and really all I did was add a band to them.) I'm disappointed with myself that I was unable to do a "theme" hat every month, but so many things conspired against me, including my own inability to focus on anything for too long. Still, 34 hats over 13 months is pretty impressive...

Monday, October 7, 2013

October's Hat: Pumpkin Beret

A quickie, made in a few hours. This is the same beret pattern I always use (McCall's 2629, out of print), but the top of the beret is pieced to look like the lobes (ribs?) of a pumpkin. Once I got it all sewn together, I ran a stitch up the bottom of the hat to connect with the pieced top. Yes, there is a seam that runs through the middle of my "pumpkin," but I didn't want to spend the day figuring out how to do it without the seam.

To get the stem, I cut a piece of felt on slight angle and rolled it up. I stitched that together at the bottom, and secured the loose end, then stitched it to the center of my beret. I found a pattern for pumpkin leaves, and used a crocheted corkscrew to look like vine, using a YouTube tutorial. (Yes, it's true: I didn't know how to make one of those things until today.) I was lucky enough to have yarn that matched the felt on hand. In fact, all of this was from my stash.


You can see the vertical stitch here.


Honestly, I don't think this could have been any simpler. And now I have something to wear when I meet Jill Thompson later this month!

Wednesday, September 25, 2013

Geeky Creations

I'm attending Geek Girl Con next month, and nothing is ever simple. Not when you're me, anyway... So I have all these projects in my head of things I want to do/make/wear, and (as usual) things aren't going as smoothly as I would prefer.

My first project was inspired by a friend commenting that I needed a little top hat to go with the Skirt of Awesome. And dammit, he was right. I used the Fleece Fun pattern and made one with fabric left over from the skirt, and have been playing with it since, trying to get the materials exactly right.

The decorative element at the band is a button. I originally
had a brooch, but it was too big and heavy. I still have to
attach this to a headband, and sew things on.


Then I was apparently experiencing an alien possession, because I decided that I needed a petticoat to go under the Skirt of Awesome. The petticoat is equally awesome, and matches the bias tape perfectly... and is inches too short. :( So, I bought a half-slip, removed the elastic from the petticoat, and will tack it onto the half-slip to lower the level of floof so it hits the hem of the skirt.

Currently safety-pinned on, I have to sew it yet.
I decided that for the Friday night kickoff party before the convention, I wanted to go kinda butch. I found a vest (that needed new buttons, natch), a sportcoat that I found on ebay that I'm still not 100% certain of, and a purple silk tie that I am going to embellish. Plus two purple fedoras (one is a trilby) that needed feathers. I need a plain white dress shirt, that I can wear with the tie. That's proving to be the biggest problem. With all of that, I also finally decided how I wanted to finish the spray painted jeans, so I have to finish that, too.


New hats! The purple/black houndstooth came with tan and red feathers -- ew.
I want to make a charm bracelet or two, using Shrinky-Dink plastic for inkjet printers, and a couple of necklaces. I've got my images ready to print out, but otherwise haven't started on that yet.

While I was at Joann's trying to find bits and pieces for the things I'm making, I stupidly glanced at the licensed fabric (just in case they had the Girl Power stuff or any related things). And I found some moody-colored stuff with the Disney villains on it. Then I looked at it online just after midnight, and saw that it was 40% online (web-exclusive sale) and only 25% off in-store. I couldn't resist. I started planning the skirt and an overskirt to wear with it. And then I checked online this afternoon... and saw that 2 of the 5 fabrics I ordered are already "unavailable" and I had to go get them in the store. At the higher price. (grrr...)

Won't that make an awesome skirt???
In the process of writing this post, the purple fabric has become "unavailable" and my order is still "processing." OMG... /headdesk (UPDATE: As of Thursday morning, 4/5 of them are "unavailable" and searching for "villain" - how they came up before - yields no results.)

I think it's time to break out the vodka.

Tuesday, May 14, 2013

Hats on Hold

Yeah, yeah, it was bound to happen. When you have the attention span of a caffeinated puppy, it was pretty much inevitable. I'm not done with hats -- they're too much fun to make! -- but they're going to be on hold for a while, as I've bounced to other things. I would like to point out that before I bounced, I made 27 hats (no, I haven't posted all of them, obviously). So while I may not meet my Hat A Month posting goal, I have certainly made a year's worth of hats in quantity.

I'll get back to them, I have too many Plans not to.

Friday, April 5, 2013

April's Hat: More Flowers!

Spring, at last! My flower garden is showing signs of life again, and I am so happy the snow is gone.

To make this hat, I used the Folkwear Metropolitan Hat pattern. Other than the gathered detail of the crown, which kind of eluded me, I found it straightforward and easy to make. I used fleece for the exterior, and for the lining some tie-dyed cotton blend that I had from my stash.

Years ago, when I was trying to make the awful drafty windows in our old house less so, I covered them with panels of fleece as makeshift insulation. For my daughter's room I used cream and stitched bright fleece flowers (from a remnant) randomly all over them. The fleece for my hat came from those "curtains."

Sewn together, with one of the fleece flowers stitched on. Sewing on all those little flowers took forever.
It's a comfy, slouchy hat, cheery and bright and fun. And it's probably too warm to wear it now, but it can also be a great hat to wear in the cold and snow, bringing a little sunshine to a winter's day.


I will almost certainly make this hat again, but I think I will eliminate the gathered crown. Or maybe I just need to play with it some more to figure out exactly what the instructions are telling me to do...

Wednesday, March 6, 2013

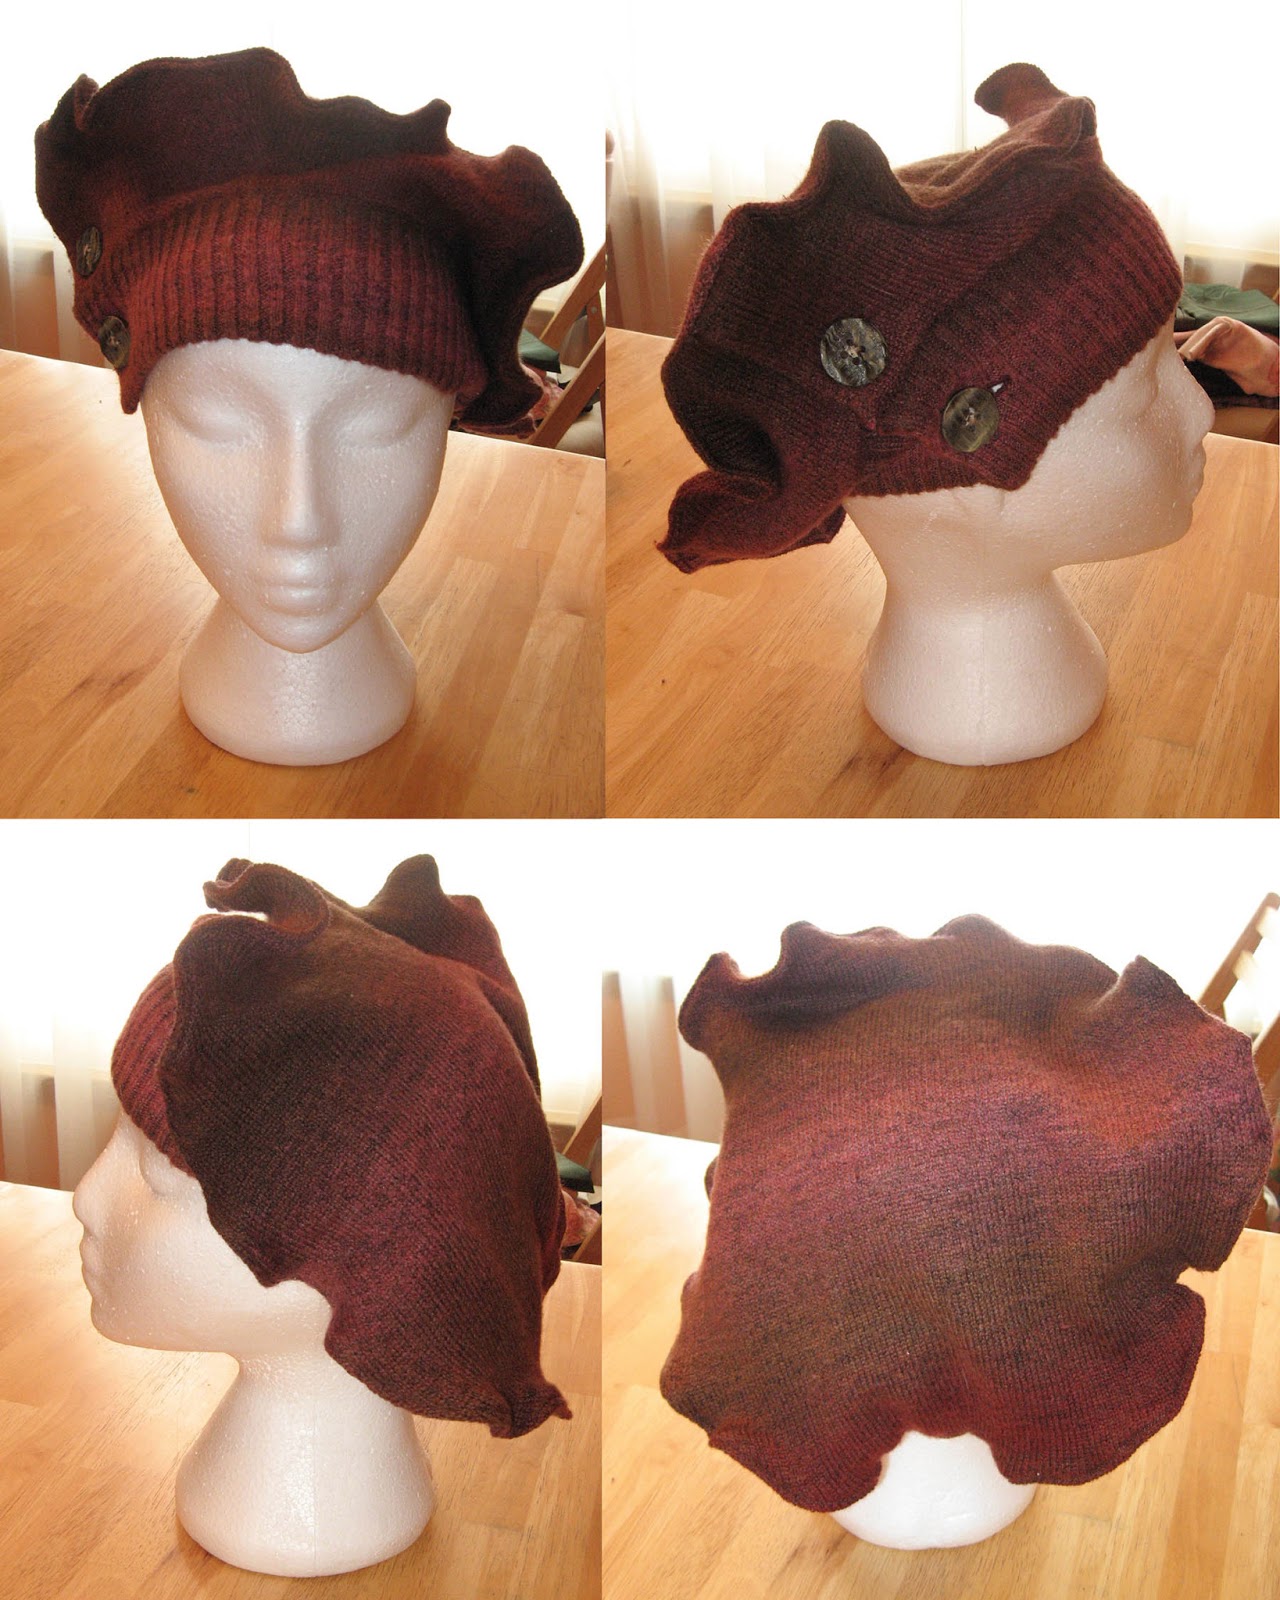
Ombre Sweater Hat


When I saw this cardigan, I loved the neck detail and the buttons. I was sure that I could flip that over and make a hat using the neckband as a headband. Didn't know how, exactly, but I was pretty sure I could do it. Plus, for $4, how could I go wrong?

Like with the cashmere hat, I cut open the seams -- but not completely! I needed some of the sweater to complete the bottom of the beret. I cut the sides open to the armpit, and the seams of the raglan sleeves a little. 


I placed the round beret pattern piece over the top of the sweater, to get a general idea of how far out I needed to cut, in this case, about three inches out from the neckband.


I couldn't find any chalk, and my tailor's pencil wasn't marking the knit, so I used a crayon.
I didn't want to pin my pattern piece to the sweater and try to cut it that way, so after I marked a few dots all around the neckline, I traced the circle on a piece of cardboard to use that for a template to mark my cut line.


Looks awful, but it worked fairly well.
I lined up the edges of my template with the dots I'd marked, tugging the sweater in place where I needed to. Pressing down hard on the cardboard, I marked the line. (Note to self: get chalk.) After the work I had to do for this, cutting the top piece was a cinch.

I had initially planned to line the top part of the hat with some extra suit lining, but decided not to after recalling what a pain in the butt the satin was from the cashmere hat. I sewed around the edge with a quarter-inch seam allowance, then did a tight zigzag between that and the edge to prevent raveling.


It ruffled the edge beautifully! I turned the hat right-side out and topstitched through the zigzag (inside), right along the edge of the hat. I wanted to stiffen it a little more.


I went around a second time in the same place, this time pulling the knit taut using both hands to encourage ruffling and reenforcing the hem.


In these photos, I had not yet done the handsewing of the buttoned cuff.

Sewn placket
In the end, I have a very funky and unique beret, that looks a little less like a beret and a little like textile art. I love that the button placket stiffens the side, so I thought I'd try to treat the shoulder seams the same way I did the crown's hem, but without the ruffling. I zigzagged up and down those seams, and what do you know - it worked! I might be able to get them even stiffer, but I don't want to mess with it when I'm happy with how it is now. My other option would be to sew in some boning, and that might be overboard.

Those seams did curl a little, but not very noticeably from the outside.
Proud of it? You bet!


I am going to need to annex that closet soon...

Tuesday, March 5, 2013

Recycled Sweater Beret


Went to Savers yesterday to look for corner shelving for the laundry room; ended up with a bag full of clothes to repurpose and no shelves. *sigh* On the other hand, I scored two cashmere sweaters for $14. I had intended to turn them both into berets, but one actually fit, so one sweater for me! I bought 4 knit tops, 3 sweaters and a sheer scarf for $30. (Shop on Mondays with their club card and save 25%.)

100% cashmere... yum!

I loved the colors of the scarf with the sweater, and wanted to try to incorporate it into the finished hat, but first I needed a hat.

I turned the sweater inside out and cut off all the seams so that I had 4 flat pieces: front, back, and sleeves. I laid out the pattern pieces to find the placement. The wider bottom piece fit on the front of the sweater, and the top went on the sweater back. The sleeve was just a tiny bit too short to accommodate the headband, so I had to find a different material for that. I used a mossy green velvet leftover from a dress Mom made my daughter a few years ago.


I needed loops to hold the scarf on the headband once the hat was finished, so I used kiwi green ribbon and machine-basted the top of the headband so I could sew it onto the hat without worrying about the ribbon.

Pinned, not yet basted.
The hat went together fairly well. The satin lining was pretty slippery against the sweater, but I was worried about raveling, so I double-stitched the outside of the beret.

Inside seam of the beret, double-stitched.

I was a bit concerned that it would make the edge too stiff, but I didn't dare clip it and risk everything falling apart. Turned out just fine.


Once the body was all sewn together, I could add my be-ribboned hatband. I double-stitched that, too, and zigzagged around the edge.

It's a little messy in there, but it won't show.
The scarf fits nicely in the loops, but it has a tendency to fall to the bottom of the loop;
I need to tack the bottom of the ribbon on the band to prevent that.


The whole thing was made in a morning. I cut apart the sweater last night, but I didn't cut the pieces until this morning. Berets are practically instant-gratification millinery. :) I'm so happy with this. It's pretty, it's warm, the scarf makes it a little different. It can be removed and a different scarf swapped in, or the hat can be worn without a scarf.


Since I already had the satin lining material, velvet for the band, ribbon and thread, this cashmere beret only cost $8. And since I have the sleeves and pieces of the front and back, I have more than enough of the sweater left over to make a pillbox. Maybe embellished with little dusty pink roses made like the ones in tutorial below, and ribbon embroidery.

http://capungmungil.blogspot.com/2011/10/diy-felt-rose-flower-tutorial.html
________________
I have to laugh. My husband just commented that if I keep making hats like this, I'll have to open a store to sell them. I told him that I'd already reached a solution: I'll annex the guestroom closet for hat storage. "Everyone should have a hat closet!" I told him. He seemed unimpressed with my genius. "You have some too!" I pointed out. Still nothing. Perhaps I merely rendered him speechless.