Showing posts with label experiment. Show all posts

Wednesday, March 6, 2013

Ombre Sweater Hat


When I saw this cardigan, I loved the neck detail and the buttons. I was sure that I could flip that over and make a hat using the neckband as a headband. Didn't know how, exactly, but I was pretty sure I could do it. Plus, for $4, how could I go wrong?

Like with the cashmere hat, I cut open the seams -- but not completely! I needed some of the sweater to complete the bottom of the beret. I cut the sides open to the armpit, and the seams of the raglan sleeves a little. 


I placed the round beret pattern piece over the top of the sweater, to get a general idea of how far out I needed to cut, in this case, about three inches out from the neckband.


I couldn't find any chalk, and my tailor's pencil wasn't marking the knit, so I used a crayon.
I didn't want to pin my pattern piece to the sweater and try to cut it that way, so after I marked a few dots all around the neckline, I traced the circle on a piece of cardboard to use that for a template to mark my cut line.


Looks awful, but it worked fairly well.
I lined up the edges of my template with the dots I'd marked, tugging the sweater in place where I needed to. Pressing down hard on the cardboard, I marked the line. (Note to self: get chalk.) After the work I had to do for this, cutting the top piece was a cinch.

I had initially planned to line the top part of the hat with some extra suit lining, but decided not to after recalling what a pain in the butt the satin was from the cashmere hat. I sewed around the edge with a quarter-inch seam allowance, then did a tight zigzag between that and the edge to prevent raveling.


It ruffled the edge beautifully! I turned the hat right-side out and topstitched through the zigzag (inside), right along the edge of the hat. I wanted to stiffen it a little more.


I went around a second time in the same place, this time pulling the knit taut using both hands to encourage ruffling and reenforcing the hem.

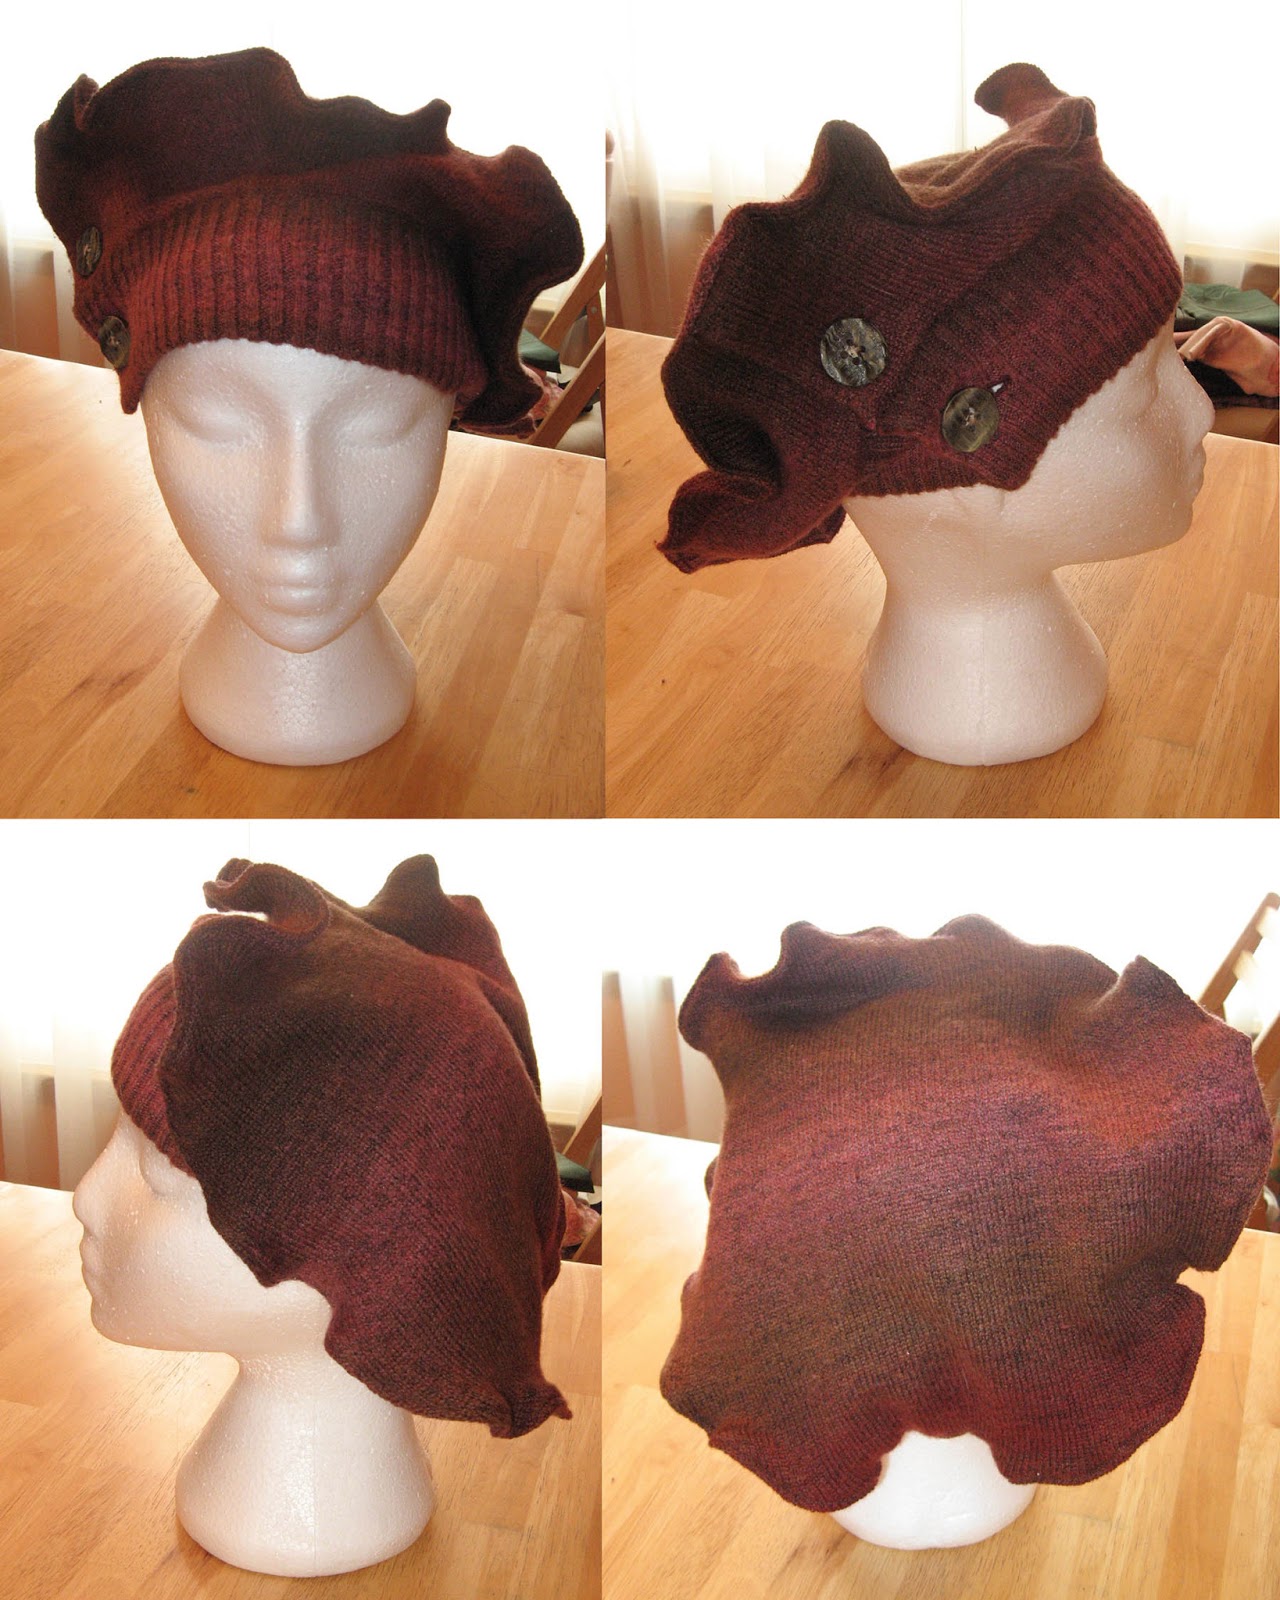
In these photos, I had not yet done the handsewing of the buttoned cuff.

Sewn placket
In the end, I have a very funky and unique beret, that looks a little less like a beret and a little like textile art. I love that the button placket stiffens the side, so I thought I'd try to treat the shoulder seams the same way I did the crown's hem, but without the ruffling. I zigzagged up and down those seams, and what do you know - it worked! I might be able to get them even stiffer, but I don't want to mess with it when I'm happy with how it is now. My other option would be to sew in some boning, and that might be overboard.

Those seams did curl a little, but not very noticeably from the outside.
Proud of it? You bet!


I am going to need to annex that closet soon...

Sunday, March 3, 2013

(Not So) Quickie Beret


I wanted to make a beret that was reversible, and none of the pages I saw online were quite what I needed. I had a flame-print piece of a fat quarter (not even a whole fat quarter, but I didn't need it all) and decided to pair it with a copper-colored liquid lamé.

I cut the largest circle I could from the cotton, about 18 inches in diameter, and cut another piece of the metallic knit. I did a little math to find the circumference* of that circle (56.4 inches). I needed to pleat or gather the edges to get something that I could wear. I subtracted 22 inches (head size) from the circumference, and got 34 (rounded down). I could make 34 1-inch pleats, or 17 2-inch pleats to get the band circumference I needed. I rounded the 17 to 16 for an even number, and marked 8 points on my circle, then marked the middle of each of those points to get 16. I made my pleats and ended up with an inner circumference of 24 inches -- too big for my head, but figured I could adjust it when I put the band on. I basted them together to keep the pleats as flat as possible.

I used the band pattern piece from my trusty McCall's beret pattern, and pinned it onto my beret, trying to be careful and cover the basted seam of the crown piece. (I didn't 100% succeed. I had to fix a couple of places where I missed when I flipped it inside out.) The band is a little off-kilter, but it's black velvet, so it doesn't show too badly.

I'm calling this experiment a success. I managed to do what I wanted to do: create a reversible beret. I will have to play with the math a little more on any hats I make like this going forward, and it would be worth it to make a pattern piece with the pleat points marked. (Also, liquid lamé is a bit of a pain to work with.) The hat is a little smaller than the others I've made, but that was the constraint of the cotton scrap. It's also pretty floppy; that could be fixed by adding a lightweight interfacing between the layers to give it a little more body. A larger circumference hat would require more, or larger, pleats.

* To figure the circumference of a circle, multiply the diameter by π (3.1415). 


Because of some of the trouble I ran into with getting the pleats even, the pleats basted, and getting the band to completely cover the basting stitches, this wasn't as "quickie" as it might have been. But it worked. Going forward, I know I can do this again, and get the results I want. My concept worked. (Yay, me.) And since this was just messing around to see if I could do it, I don't have pics of the progress, only the finished piece. When I make another, I'll do a full tutorial of my process.

Sunday, December 30, 2012

Because I Can

Often, my reason for doing something is simply "because I can." I've been wanting to make one of these for a while, and since I was in a chapeau sort of mood, I did.


I used this pattern at Fleece Fun, but I didn't bother to read directions or watch videos; I just dove in and hoped it all worked out. (Honestly, I learn best this way.)

I used the same ivory fleece as with the other hat, some "natural fiber ribbon" (not sure what it's made of), some feathers and a large gold and white button. It's a teeny bit lopsided, the shaft of the top hat leans forward, but with the embellishments it doesn't seem as noticeable. I did use cardstock to make it a little rigid, as the pattern called for, but I didn't really read how I was supposed to put it in. Perhaps had I read the directions, I wouldn't have that lean up there.


Right
Front
Left
Back
Bottom

Not bad for a first attempt! :D I can see that making these could be completely addictive. I wonder how ridiculous it would be to wear this to the grocery store...

Monday, November 5, 2012

An Experiment

The cuffs I have in mind to make for my daughter and me made me wonder just how I'd go about it, so I thought I'd experiment a little. I cut the ribbed cuff off of one of the pink sweater sleeves, and blanket stitched around the edges. Then I went and played in my fabric scraps.


It's not as heavily embellished as some of the examples I found online and loved, but it's a nice first attempt at this.


The disc is a Japanese postage stamp, with a circle of a page in Japanese (I think), sandwiched in fused plastic. That was sort of hit-and-miss. It was trickier than it seemed it might be.


I used ribbon and a button for my toggle/clasp, and stitched more buttons and beads to it.


The bow in the last picture was my first try at laminated felting. I used a rectangular scrap of lace and felted variegated purple wool onto it. It didn't quite work out as I'd hoped, so I pinched the middle and tied ribbon around it to make a bow.

I did the blanket stitching and the felted lace piece while watching tv last night, and that didn't take any time at all. I did the embellishing all this morning. Everything was stuff I had on hand already, so it also went quickly.

Monday, January 9, 2012

Conversations with My Dad

Dad and I are a lot alike, much to my mother's chagrin. They were up for Christmas this past weekend, and Dad (being Dad) made a pretty snarky comment about my admittedly poor housekeeping. (I've been hearing it for years; he can say all he wants, but nothing is going to make me love doing dishes, running the vacuum or washing clothes. Since we are a lot alike, comments like that roll right off.) He said maybe if I painted a rainbow on the vacuum, or in the laundry room, I'd spend more time on those activities. (Not.) However, it did make me think... what if I DID paint a rainbow in there? It's in a rarely-seen corner -- you'd only witness my insanity if you used the powder room (or the washer/dryer), even coming in the back door, because of the way the door swings, you might not see it. Hmmmm...

My love of color and creative side comes from Mom. (Weird combo, huh? "Piss off" attitude in a Rainbow Brite package.) The other thing I've been contemplating recently is a large art piece using broken tempered glass, a technique I saw on Color Splash with David Bromstad. I had to scan through a full 3 seasons, and 2 episodes of season 4 before I found it to refresh my memory and learn what he used for adhesive. I had no idea what I wanted to do with my "canvas" (he often uses plywood, as he did with this piece), only that I wanted to do something incorporating broken safety glass that I was lucky enough to save from a dumpster (before it went in the trash). Then I knew what I wanted to do.

Incorporating both ideas, the rainbow in the laundry room, the art-with-glass... And now I'm so damn excited, I can hardly wait to get started. It's going to be Big -- taking up a large portion of the wall above the shelf over the washer/dryer. It's also going to be heavy, so I may need my husband to rout out "keyholes" on the back of my substrate to hang it on the wall, using heavy screws in the studs. Details, details... don't trouble me with those little things, I have a mess to make!

Monday, May 23, 2011

Paper Tole

Paper tole is not a new idea. I recall it had some popularity in the 1970s, and I remember having a Holly Hobbie plaque or two with this technique. Basically, take several copies of the same image, cut them so you have several pieces you can layer using foam tape or cardboard, etc., so your layers are raised up from one another.


I used what I hoped would be a simple enough image that it would be clear where my different layers were. Since I was just playing, to see if I could make it work, I printed my mandalas (4 of them) onto white cardstock.


I found some foam tape that I was able to cut into small pieces, and assemble, and I started with the smallest (highest when finished) piece first.


One of the mandalas yielded two different pieces: the hexagonal "ring" and the six-pointed central star.


I think it turned out well for something I more or less dashed together. Trying this with photo paper will be next.

Saturday, April 23, 2011

Inspirations

Sewing & Quilting
Mom gave me The Complete Photo Guide to Textile Art for Easter, and the same day I received in the mail 2 back issues of Art Quilting Studio. The ideas that are pictured in them are very inspiring. Some things I cannot wait to try. I think I've come up with how to make the art quilt for the Hawai'ian fabric I bought nearly 4 years ago, too. I believe I need to practice some more on smaller scales first, though, before I tackle something that large.

I love that I'm getting positive feedback on the first little quilt I did. I love that the new one I'm working on is coming together so well. I do wish I was a little more confident; I still mostly feel like I don't have a clue. It's good that I learn best by doing, and that I am doing, and not just thinking and daydreaming. I have enough ideas, and enough enthusiasm, to keep me busy for a while. And all that work will give me plenty of practice, and chances to become more proficient and confident...

Which will also help, I hope, with the art dolls I want to make so much. I think part of the issue with the first little pass I made was the use of too many dissimilar fabrics that don't want to piece together neatly. If I stick to a woven cotton (even a cotton blend) I think I'll be ok. I also think I need to do a main "sheet" of piecework to cut my doll body from, rather than trying to get pieces to conform to the pattern. Perhaps I'll make my daughter's doll using some of the textile altering techniques in my books and magazines as an experimental palette. Paint, dye, stamp, resist, marbling... *grin* I need more white fabric! (But I'm probably getting ahead of myself again.)

Gardening & Photography
A lot of my photos have come from my own or friends' gardens. Sadly, when we moved, I left behind an established (small) flower bed that I was quite fond of. The new house has weedy, sad, very neglected beds that I hope to turn into wonderful inspiring gardens soon. Getting perennials isn't cheap though, so this year I'll jumpstart the process using seed mixtures, containing both annual and perennial seeds. Hopefully those will be successful and I can get back to my camera later in the summer, but until then I need to see what the local area has to offer in terms of preserves, parks and trails. And I can always pester the neighbors for their flowers, or maybe drive out to the Chicago Botanic Garden (a mere 45 minutes away).

My passions have a way of feeding each other. One thing sparks another, which distracts my attention from a third thing, and pretty soon I've gotten so far afield, it's hard to know how I got to where I am. This sort of short-attention-span art tends to leave me with a lot of UFOs, but I also learn so much by experimenting with new things. It's hard to be upset with the destination, when the journey has been so entertaining.

Tuesday, July 15, 2008

IT WORKED!!!

My experiment was a success! After discussing the possibilities with an employee at Hobby Lobby, I came to this solution.

Using a glass jar, some recycled paper and a bit of blue dryer lint, I tore the paper into fairly small pieces and added the lint and hot water. While it soaked, I did steps 1-3 below. The dark blob on the left side of the jar is the lint.

Step 1: Cut a sheet of perforated plastic canvas into rectangles 2.5"x3.5", and attaching two pieces of wire to the short sides of one, leaving the second rectangle alone.

Step 2: Using the LID half of a plastic box designed for trading cards, this made my "deckle" and the plastic canvas pieces became the screens.

Step 3: Removing the screen from the box, I added a small amount of water and white glue, then replaced the handled screen. Please note: the picture shows the water in the bottom of the box, not the lid. This was an error; with the handles, the screen doesn't fit flat like it does in the lid.

I used an immersion blender (stick blender) to blend the paper and lint. I ran into a bit of a snag, because the dryer lint also had dog hair and Wendy hair, which clogged the blades of the blender. Once I cleaned it out, it worked fine.

Step 4: Using a measuring scoop, I dropped around a 1/3 cup of my paper pulp into the box on top of the handled screen. I added the pulp gradually, because I didn't know how much it would need, so the scoop in the picture isn't full.

Step 5: The box on the left shows the top screen pressed in place. The box on the right shows the pulp swimming on top of the handled screen.

Step 6: Carefully lifting out the screens, I squeezed out the extra water over the box, and set the screen to the side while I did that with the other box.

Step 7: I put the two screens with their pulpy filling onto a washcloth folded in half, then folded then pressed the free end of the cloth firmly onto the screens.
Step 8: After blotting the worst of the water out of the screen sandwich, I peeled the top screen off s-l-o-w-l-y, starting with one corner. Then I pressed the handled screen pulp-side-down onto a dry paper towel on newspaper to blot again.

Step 9: I then carefully peeled the handled screen off of the much-dryer pulp (below) and set it on glossy newspaper ads to dry a bit.

Step 10: On the left, you see what I ended up with after Step 9. The one on the right is what the paper looks like mostly dry, after I had a go with the hairdryer.
I'm so excited that this worked! Of course, I got way carried away with the blue paper, and now have much pulp to process. Eh! Live and learn!