Showing posts with label hat-a-month. Show all posts

Wednesday, January 8, 2014

A Year in Hats

I started making hats at the end of December. Then in January, this happened:
I had a crazy thought this morning, before the caffeine hit my bloodstream: Wouldn't it be awesome to make a hat a day? Then I realized how insane that would be; 365 hats?! Even if I gave a bunch away, what it the hell would I do with them all? OK, hat a week, then, my idiot brain says. No -- 52 hats is still unmanageable. Fine, how about one a month? Fine. Fine. OK! (Ahem... everyone has conversations with themselves, right..?)
This post is the chronicle of hats, with new and improved photos (for most of them) and links to the posts and/or tutorials where applicable.

The Prequel (Dec. '12)

Month One (Jan. '13)


Month Two (Feb. '13)


Month Three (Mar. '13)
  • (Not So) Quickie Beret (reversible)
  • March's Hat: Flowers (beret)
  • refinished old berets 
  • Recycled Sweater Beret (painful lesson learned: some hats look like dog toys to a dog)
  • Ombre Sweater Hat (beret, sort of)
  • DC pieced beret 
  • Wonder Woman berets (2)
  • oval "fur" pillbox (not satisfied with this one, and will be reworking it)
  • craft felt mini top hat (using a very modified version of this pattern)
  • recycled knit shirt berets (4)
  • felted wool sweater beret (unfinished)
  • dragon hat (pattern from Fleece Fun) -- sadly, I don't seem to have a photo of this, and I gave it away


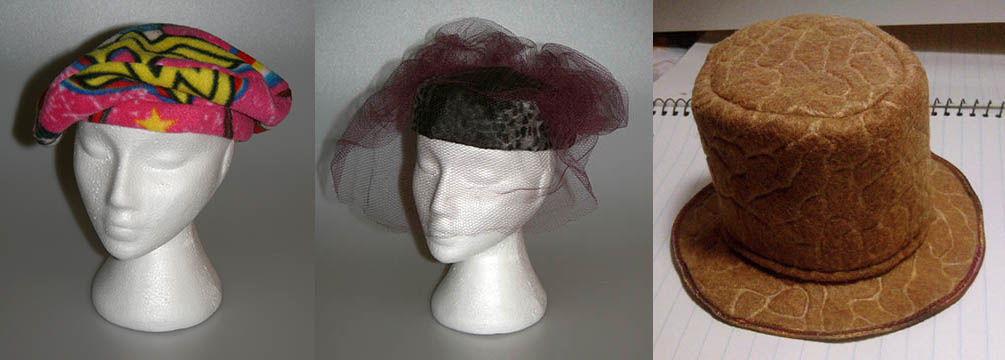


Month Four (Apr. '13)

[cue crickets chirping]

Month Nine (Sept. '13)


Month Ten (Oct. '13) 

Thirteen months later, the number of hats made ended up being... 34! (I'm not counting the modifications I made to the berets already had. Those were made for me by my mother years ago, and really all I did was add a band to them.) I'm disappointed with myself that I was unable to do a "theme" hat every month, but so many things conspired against me, including my own inability to focus on anything for too long. Still, 34 hats over 13 months is pretty impressive...

Monday, October 7, 2013

October's Hat: Pumpkin Beret

A quickie, made in a few hours. This is the same beret pattern I always use (McCall's 2629, out of print), but the top of the beret is pieced to look like the lobes (ribs?) of a pumpkin. Once I got it all sewn together, I ran a stitch up the bottom of the hat to connect with the pieced top. Yes, there is a seam that runs through the middle of my "pumpkin," but I didn't want to spend the day figuring out how to do it without the seam.

To get the stem, I cut a piece of felt on slight angle and rolled it up. I stitched that together at the bottom, and secured the loose end, then stitched it to the center of my beret. I found a pattern for pumpkin leaves, and used a crocheted corkscrew to look like vine, using a YouTube tutorial. (Yes, it's true: I didn't know how to make one of those things until today.) I was lucky enough to have yarn that matched the felt on hand. In fact, all of this was from my stash.


You can see the vertical stitch here.


Honestly, I don't think this could have been any simpler. And now I have something to wear when I meet Jill Thompson later this month!

Tuesday, May 14, 2013

Hats on Hold

Yeah, yeah, it was bound to happen. When you have the attention span of a caffeinated puppy, it was pretty much inevitable. I'm not done with hats -- they're too much fun to make! -- but they're going to be on hold for a while, as I've bounced to other things. I would like to point out that before I bounced, I made 27 hats (no, I haven't posted all of them, obviously). So while I may not meet my Hat A Month posting goal, I have certainly made a year's worth of hats in quantity.

I'll get back to them, I have too many Plans not to.

Friday, April 5, 2013

April's Hat: More Flowers!

Spring, at last! My flower garden is showing signs of life again, and I am so happy the snow is gone.

To make this hat, I used the Folkwear Metropolitan Hat pattern. Other than the gathered detail of the crown, which kind of eluded me, I found it straightforward and easy to make. I used fleece for the exterior, and for the lining some tie-dyed cotton blend that I had from my stash.

Years ago, when I was trying to make the awful drafty windows in our old house less so, I covered them with panels of fleece as makeshift insulation. For my daughter's room I used cream and stitched bright fleece flowers (from a remnant) randomly all over them. The fleece for my hat came from those "curtains."

Sewn together, with one of the fleece flowers stitched on. Sewing on all those little flowers took forever.
It's a comfy, slouchy hat, cheery and bright and fun. And it's probably too warm to wear it now, but it can also be a great hat to wear in the cold and snow, bringing a little sunshine to a winter's day.


I will almost certainly make this hat again, but I think I will eliminate the gathered crown. Or maybe I just need to play with it some more to figure out exactly what the instructions are telling me to do...

Sunday, March 3, 2013

March's Hat: Flowers

 
We've had quite a bit of snow lately, and while we need the precipitation because of the summer drought, frankly I'm sick of shoveling the stuff. I've been dreaming about my garden, sleeping under its white fluffy blanket. And while I've been dreaming of flowers, the flowers have inspired hats.

I used a tutorial at Fleece Fun for no-sew hair flowers, but on a much larger scale. I used polyester suit lining in three colors: off-white, pale pink and medium pink, and make four circles in each color, each a little smaller than the last, and employed Angel's method for burning the edges to create a curled and ruffled effect.


I made an apple-green satin beret (stiffened a bit with interfacing), and sewed around the outside of the crown to make it more stiff.


All of the off-white layers were machine-stitched together...
...then the light pink layers were machine-stitched to that...
...and three of the darker pink layers were machine-stitched to that,
making eleven layers.


The layers of petals were sewn to the beret.
The final pink petal was sewn on with the glass beads that make the flower's center.


I am so pleased with the way this turned out. It's probably as close to couture as I can manage at this point in my millinery self-education. It's considerably more feminine and delicate than anything I typically wear, so I'm not certain at this point what I'll wear with it, but I do love this hat.

Thursday, February 14, 2013

February's Hat(s): Valentines


This is not a tutorial, mainly because I forgot to take photos of my process. However, I will describe what I did. If you want to try it, hopefully that will give you enough to get you started.

I bought a couple of heart-shaped candy boxes, with the idea of turning one of them into a velvet Conversation Heart pillbox hat. I never did find any pink velvet... Anyway, the Russell Stover boxes I got were not quite the right size. The little 3-piece box (right) was too small, and the larger box (don't remember how many pieces, but it was the next size up -- 7, maybe?) was too large. Bummer.

The larger heart is 5.5" in the longest dimension, the smaller is 4"; both are 1" deep.
The gift box (not pictured) is 4.5" and about 1.5" deep.
In my quest for pink velvet, I found a small heart-shaped gift box at Joann's for 99¢. The size was about midway between the candy boxes, sturdier, and taller. This worked out perfectly! I needed to contour the sides of the box so that it would fit more closely to my head. Basically, I shaved the sides in an arc until it felt comfortable on my head and didn't dig in. I used an X-acto knife for that.

I used pink velour to sew a cover for the box, basically making a fabric version I hoped to slip over it that would fix snugly, but when I tried it, it did not work as I'd hoped. I hot glued pink felt on the sides to cover the printed design, and to give a softer surface for the velour to cover, particularly the bottom edge of the sides that were a little uneven from my surgery of them. My second attempt was to stretch the velour over the box and glue it on the inside. I started from the front (the most visible part) and worked my way around. I did end up with two pleats at the back that I might have been able to dart to make fit better, but I was afraid to cut into the fabric at that point because I didn't have any to spare.

Contoured back and sewn up pleats.

Contoured front.

After I got the velour glued in place, I lined the inside of the box with more felt to cover the folded-over sides, and crown. I did sew the edge of the felt down; that helped me snug the velour down a little more. Once the edge was sewn, I did glue the sides. I also sewed the pleats at the back, to try and flatten them more.


I used a glossy fabric paint writer (Scribbles®) to spell out "BE MINE" on the top, after marking the letters with a tailor's pencil. Unfortunately, I still haven't gotten all the marks off from that. The lettering isn't perfect, but considering my handwriting, it's pretty fabulous.


How I'm getting it to stay on my head is a little strange, but I'll try to describe it. I bought this nifty double hair comb thingie at Target. Because of the shape of the heart, it's too wide without fussing with it a bit. I have to push the front edges closer together to allow them to be completely covered by the hat.


I wound my hair into a pretty tight bun, secured with hair sticks, then put the combs in where I wanted the hat to sit. Since it's in that bun, the hair on the top of my head makes a solid foundation for the combs to be in. With the front ends pushed closer, all I had to do was put the hat over the top of the combs and make sure that they were tucked in. Friction holds it in place! My husband took me to lunch, and with the wandering we did before and after, it's stayed firmly on my head with no slipping.

Summary:
1. Contour box to hug the shape of your head.
2. Cover box with felt.
3. Cover box with desired fabric.
4. Line inside of box.
5. Embellish.
6. Secure to your head.
7. Prepare for compliments.

BONUS HAT!

Since I had it, I used one of my smaller candy boxes to make a fascinator/headband inspired by one I saw online.


The small box is hot glued to a wide brown satin headband.


The satin ribbon covers the Russell Stover logo on the lid. But take off the lid and you will find...


Inside the box are three felt candies, glued into the paper cups. The plastic divider is glued into the bottom of the box (it melted, but that was ok), and then the candies were glued into that. The bottom of the box is covered with red felt (hiding all that silly nutritional information. I also used a red Sharpie on the edges of the box to unify the color.

It's silly and fun, and the chocolates are fairly realistic looking. Hubby actually reached out to take one (in his defense, the light was dim where I showed it to him).

So there you have it, two hats for February! Happy Valentine's Day!

Tuesday, February 12, 2013

Fits & Starts

HATS

I haven't forgotten about my February Hat! I've been working on it -- "them" actually -- but I've run into a few issues here and there that have impeded progress. I hope to have them finished today or tomorrow. They need to be done in time for Valentine's Day.

ALTERATIONS

In other news, I've decided to alter some clothes my mother made for me years ago. The jumpers that I so loved at the time are too young a style for me, and no longer fit. I'm removing the bodice to remake them as skirts. The next part is a bit trickier. I could roll the new waistband and sew in elastic, or I could make and sew on a waistband that. Easier by far to roll it, but I don't know if that's going to put too much bulk around the waist when it's gathered. The other issue with making a new waistband is that I'll have to cut material off the hem to make the casing, and I'm not sure if that will make the skirt too short. The best way (for me, YMMV) is to do one with the rolled waist and see if it works. If it does, I'm good to go on the others; if not, I'll need to look at my options. I'm also toying with dyeing one and embellishing others. I think I'll take the berets with me when I go to the store so I'll have the material with me in case I need to check colors.

MORE HATS

Two of the berets I made recently were made without a headband. For whatever reason, Mom and I decided that they didn't need them when she made the for me (to match the jumpers), so that was how I made the once I made. On a whim the other day, I cut out the band piece and sewed it on the rose beret, and what do you know, it does look better. So, I think I need to do the same for the other berets, including the ones Mom made. I can use the material from the bodices to get the band, with some creative placing of the pattern piece.

I'm planning a couple more hats, but not sure where they're going to fit into the monthly lineup. They may be bonus hats, because I'm crazy that way. I bought the material for one this morning, and in my obsessive plunder of the remnants, found some pleather... and I'm dying to dig into it. Remnants seriously rock. Not only are they discounted from what you'd pay off the bolt, but they're usually just the right amount for making a hat. A beret only takes about a half-yard, and the other hats I've made -- the toque and pillboxes -- use even less. Anyway, I didn't find much that tickled my fancy as far as embellishing the remade skirts, but it's not like I have a deadline, and I can double-check my stash.

Tuesday, January 8, 2013

January's Hat: Snow

Those glist'ning houses that seem to be built of snow
Snow
Oh, to see a mountain covered with a quilt of snow
the song "Snow" from White Christmas (movie)

This photo won 3rd place in the local county fair in the category "Shadows."
I was so happy to have no interruptions for the first day when my daughter resumed school after the winter break, I made my January hat. My inspiration, though it's been scarce this season so far, was snow.

It didn't start out that way; it started out as another practice hat. I had tried the video tutorial for making the pillbox hat and it didn't work. I'm betting operator error, but it looked like she was using felt to make the one in the vid, and since it's naturally more structural, she didn't use any interfacing or lining. I lined mine, but without interfacing or some kind of stiffening going on, my pillbox is too soft to hold its shape. Also, her instructions were not all that clear. The sides of the hat have a bit of a peak; the center of the band is taller than the back of the band, but she doesn't say which side to sew the crown to, and I didn't mark it (she didn't) so once it was cut and the pattern piece unpinned from it I wasn't even sure which was top and which was bottom.

I'm nearly happy with it. I think my contrast-stitching has too much contrast,
and it desperately needs something to give it some body, but it almost worked.
Anyway. I decided to modify (again!) that McCall's pattern #2692 from '86. This new hat uses the same pattern pieces as the hats I made in fleece! I reduced the pieces using Photoshop, scanning them in and reducing them 85% and printing them out. The sides were too long to scan, so I folded it at the center and marked that end of my new pattern piece "FOLD."

Scanned, desaturated, and reduced pattern pieces
I found the random polka-dot patterned dotted swiss material, saw how much of it there was, and figured I'd use that, and added medium-weight sew-in interfacing. I didn't line it. After I cut everything out, I machine-basted my fabric and interfacing pieces together. I stitched the short ends together, pressed open the seam (I didn't use her technique in the video of sewing that down). When I started pinning on the crown, it became pretty clear that reduced the same percentage or not, it was a bit too big. I ended up pinning it together from my basting stitch rather than matching the edges, and then trimming the excess and notching it as usual.

Once I got it all sewn together, I turned under the raw edge and checked the height, turned it some more, adjusting the size of the band until I was happy with it. That got stitched down twice, which gives it a little more firmness as well as securing hem. Most of the side band is now doubled fabric and interfacing, making it pretty sturdy.


Thrilled with my creation, I used matching ribbon and white tulle to make a pouf for the side (sewing the ribbon to the tulle, then gathering the opposite side), securing it with a silver and light blue button from my stash. It still needed something, so I looked to see if I had any white sequins the right size, thinking I'd sew them onto all the smaller dots on the sides. I did have, but didn't like the way they looked, but found some flat clear sequins that I used instead. Each one sewn on using two stitches of white thread... that took far longer to do than sewing the hat! I tried to keep the thread from showing where I could, going between the layers of fabric to the next dot. I could have skipped that and gone faster, but it looks nicer and the threads are not in danger of snagging and breaking.


I have not yet decided what means I will use for securing it to my head, and I'm not certain that it still doesn't need something -- it still looks kinda plain -- but I'm calling it 97% done.

To me, the white spots on an aqua field on dotted swiss looks like snow falling from a blue sky. So, my inspiration, born of a casual "eh, I'll use this," turned into something I'm really quite proud of.

back

front

left side

right side
Making it up as you go is kinda fun!