Sunday, June 9, 2013

Hallowe'en Comes Early!

I have a ton of action figures in the basement, displayed on Ikea bookshelves. One shelf had some of my Hallowe'en Barbies, but they were boxed and three deep on the shelf, so you couldn't see all of them. I got the idea to move them to the children's library (AKA, the guest room) and display them a little differently after I saw this blog post. I loved Valerie's idea of using props that are the right scale ("play scale" according to some Google searching), and decided that I needed a spooky tree for the witches. I had in my head an idea, and today I made it work. (Photo intensive!)

I forgot to take a photo of the first step, gathering a piece of dowel and a wire skeleton that had been a floral bush. Both things I had on hand, it just required me pulling the flowers off of the bush and taping them together. The dowel was even a good length without needing to be trimmed, because it was from another project already.

The dowel and the wire skeleton taped together, and all my gathered supplies.

Once I had those taped together, I wrapped the bottom part of the dowel in sheets of foam packing material, and pushed a toilet paper roll over the end.


Then I started layering newspaper around that, and pushed bent chenille stems into the cardboard tube. Those are going to be roots.


I wrapped the wire stems with more chenille stems, making branches.


It's about 32 inches tall.


I used newspaper to bulk up the base of the branches before I started taping them. The newspaper is also important because it enables the trunk and branches to be compressed (by squeezing them) after the tape is applied. This gives it a textured, wrinkled surface, looking more like bark.


I ended up using two different masking tapes, the second one being Scotch brand; the other brand wasn't sticking to itself very well. The Scotch masking tape did much better.

I added two more branches scavenged from more floral stems, because having branches only at the top looked weird. Once I had wrapped the entire tree -- branches and roots -- I used a twisted ring of newspaper to make a knothole on the trunk. The roots are reinforced with toothpicks, but it still doesn't sit quite level. I think I will probably glue a piece of balsa to the bottom to help it sit flat.

To show scale, with one of the dolls that will be part of the display.
I actually ended up cutting open the bottom and stuffing a couple of rocks into the cardboard tube, because it was really top-heavy. I haven't decided yet how I will color the tree, paint or stain or shoe polish... and I want to make "Spanish moss" with dyed cheesecloth to drape over the branches. (The guest room was supposed to be Mardi Gras inspired, so to keep it at least a little on topic, these witches are going to be in New Orleans, since NOLA also has a humongous Hallowe'en celebration.)

But it's mostly done; from concept to execution in one day. I even stained the wood shelves to match the bookcases that are in the library!

UPDATE #1: I did end up spray painting it flat black. I decided that while the shoe polish treatment does look cool (google: shoe polish masking tape), it's not the effect I want. So once this dries, I'm going to dry brush brownish-grey on the high spots. In the meantime, I need to hunt up some cheesecloth for the Spanish moss... I also need to do something about the base, because it really doesn't want to stand upright.


UPDATE #2: I added thin pieces of balsa to the base to help stabilize it. I also finished the detail painting I wanted to do, along with a little surprise.

Without flash

With flash
Surprise!

UPDATE #3: Cheesecloth moss is finished! I trimmed the "finished" edges off the strip of cheesecloth, because I wanted it to be ragged. I cut it into strips of varying lengths and widths, and played with the placement on the tree until I had what I felt were enough.


I used grey and yellow-green acrylic paint in quite a bit of water and added the strips. It wasn't enough pigment, though, so I added black paint and added the strips to the paint/water bath. I squeezed out the water, and patted the cheesecloth with a paper towel. There were some bits of paint that didn't get completely dissolved, and that left some darker spots on some of the strips. I used a tension rod in a doorway to hang the strips to dry. I could have dried them flat, but the paint stiffens the cloth; if I wanted them to hang over the branches, I needed to hang them from something.


They also wanted to curl into themselves, so I had to gently pull the strips back open. I didn't want it to be completely flat, though, because Spanish moss doesn't hang in a tidy sheet from the trees, either. Once the pieces were dry (didn't take long), I started putting them back on the tree. The color didn't have enough green in it, and the moss is a living thing, so I used the tip of a loaded brush to apply dots of the yellow-green randomly to the hanging strips, just like you might see on living moss.


True fact -- Spanish moss isn't moss at all. It's an angiosperm, and belongs to the same family as bromeliads.

Tuesday, May 14, 2013

Hats on Hold

Yeah, yeah, it was bound to happen. When you have the attention span of a caffeinated puppy, it was pretty much inevitable. I'm not done with hats -- they're too much fun to make! -- but they're going to be on hold for a while, as I've bounced to other things. I would like to point out that before I bounced, I made 27 hats (no, I haven't posted all of them, obviously). So while I may not meet my Hat A Month posting goal, I have certainly made a year's worth of hats in quantity.

I'll get back to them, I have too many Plans not to.

Saturday, May 4, 2013

Terrifying New Project

For an online class about gender and comic books, I had to draw a comic based on a personal experience with gender. I'm no illustrator, so that was pretty tough for me to manage. However, the assignment did start me thinking about another project that I've been working on in my head, something so personal that I'm not really even comfortable sharing it openly yet.

In the class chatroom, I was talking to another student who encouraged me to start putting things on paper (even if it was just random brainstorming) and get it off that mental back burner. So yesterday, I worked on it, pretty much all day. What I have to show for hours of work? Six hand-written pages, that I then distilled into 2 pages typed into a Word doc. That's it. *sigh* I obsessed over naming; every name was chosen deliberately, and I needed 21 names.

Then I decided to hit up our new Half Price Books store to see if they had any good books for learning to draw. I ended up with:

How to Draw Comic Book Heroes and Villains by Christopher Hart,
and How to Draw Manga V. 1 by Ben Dunn* -- I found things in both books that I thought would help,
and since it was Half Price Books, it was reasonable to get both.
I don't know what my style is, if I even have one, but both of these offered some basic mechanics as well as particular styles. I already had a sketchbook that I bought for this purpose (before I bought those books, before I started the class). So I guess now it's time to work on figure studies. The writing may always come more naturally to me, but if I can make the images I have in my head come out on paper, then maybe I'll be able to translate it into something that's really mine.

The fear comes into play when I'm honestly afraid to try, and possibly fail. This particular creation is the convergence of a number of things that are meaningful to me, so it's incredibly personal, and why I have only entrusted some of the details a couple of people. It's fragile yet...

When I have something I'm proud of, I'll share it, but until then, this project is under wraps.

__________
*Ben Dunn's website doesn't seem to be working, or I'd link him, too.

Friday, April 5, 2013

April's Hat: More Flowers!

Spring, at last! My flower garden is showing signs of life again, and I am so happy the snow is gone.

To make this hat, I used the Folkwear Metropolitan Hat pattern. Other than the gathered detail of the crown, which kind of eluded me, I found it straightforward and easy to make. I used fleece for the exterior, and for the lining some tie-dyed cotton blend that I had from my stash.

Years ago, when I was trying to make the awful drafty windows in our old house less so, I covered them with panels of fleece as makeshift insulation. For my daughter's room I used cream and stitched bright fleece flowers (from a remnant) randomly all over them. The fleece for my hat came from those "curtains."

Sewn together, with one of the fleece flowers stitched on. Sewing on all those little flowers took forever.
It's a comfy, slouchy hat, cheery and bright and fun. And it's probably too warm to wear it now, but it can also be a great hat to wear in the cold and snow, bringing a little sunshine to a winter's day.


I will almost certainly make this hat again, but I think I will eliminate the gathered crown. Or maybe I just need to play with it some more to figure out exactly what the instructions are telling me to do...

Tuesday, March 19, 2013

Pattern Review: Sashay Skirt

Last August, I got a pattern and some material, and planned to make a skirt from some DC Superheroine fabric. This past weekend I finally made it, and a beret to match (naturally). The Indygo Junction pattern for the Sashay Skirt could not be easier unless it sewed itself.

There is a single pattern piece, it's sized by adding panels to the trumpet skirt, and has an elastic waistband. The directions call for serging the seams, leaving them exposed, with the option of sewing them to the inside. I don't have a serger, and I don't care for the look of all those exposed seams, so I sewed them to the inside. Honestly, it took way more time to pin all those panels than it did to sew them together.

The hem is curved and I quickly discarded a rolled hem as being a huge pain in the butt. I ended up using bias tape to do an enclosed hem instead. The coordinating quarter inch tape stiffened the hem a little, making it tend to stand out a bit; it's an effect that looks quite nice. It was time consuming; my hem was nearly 6 yards around because of the number of panels I used. For all the pinning and seams that had to be sewn, I still got it done in a day.

It's a really cute skirt, hitting me just below the knee. The flared hem is flattering and the elastic waist comfortable. It moves nicely, swirling with my steps, and twirling in it flares it out without being immodest since it's straighter at the hips. The way its pieced lends itself to many different combinations of color and pattern. Make it all one fabric, or make every one different -- it's up to you and your own sense of design. I used 4 different patterned materials from a single design line from Camelot Fabrics, but this won't be the last time I make the Sashay Skirt. And because you custom size it by the number of panels, I can easily make a skirt for my daughter using that same single pattern piece, unlike with most patterns where you have to cut into a multiple-sized pattern pieces, making them useless to make another size.

NOTE: If you have a directional pattern on the material, you're going to need more fabric than the instructions call for unless you don't care if some of your panels are upside down. (One of my blue panels is -- oops!)

You can see here that the light blue panel on the left of the photo is upside down.
Lots of nice flare at the bottom.
Showing how the bias tape gave a little body to the hemline.
The bottom of the beret is of a sparkly pink material that doesn't quite match the
bias tape, but coordinates nicely with the pinks in the material.
I chose to add a little bling to my skirt with hot-fix crystals, and used the assorted color pack of 300 from Tulip. Cost-wise, they were 300/$15 for 12 colors (at Joann's) vs. the Swarovski Elements 90/$10 (for two coordinating colors). Since I wanted to add them to the skirt and to the beret, and since I had a lot of colors to choose from, Tulip was the way to go, even if they're not as nice as the Swarovskis. I have added 3 to each panel of the skirt, and then finished the beret so I knew I would have enough for both, and plan to add more to the skirt.

These are not as sparkly as the
Swarovski Elements iron-on crystals,
but they're about half the cost.
I consider myself a novice seamstress. I haven't done a lot of garment sewing. I've never sewn in a zipper, and I've never done buttonholes. Pattern directions often confound me because they don't make a lot of sense, so I tend to wing it. This pattern was a piece of cake. I'm so happy that I bought it, and I'm thrilled with my results. I highly recommend it.

Wednesday, March 6, 2013

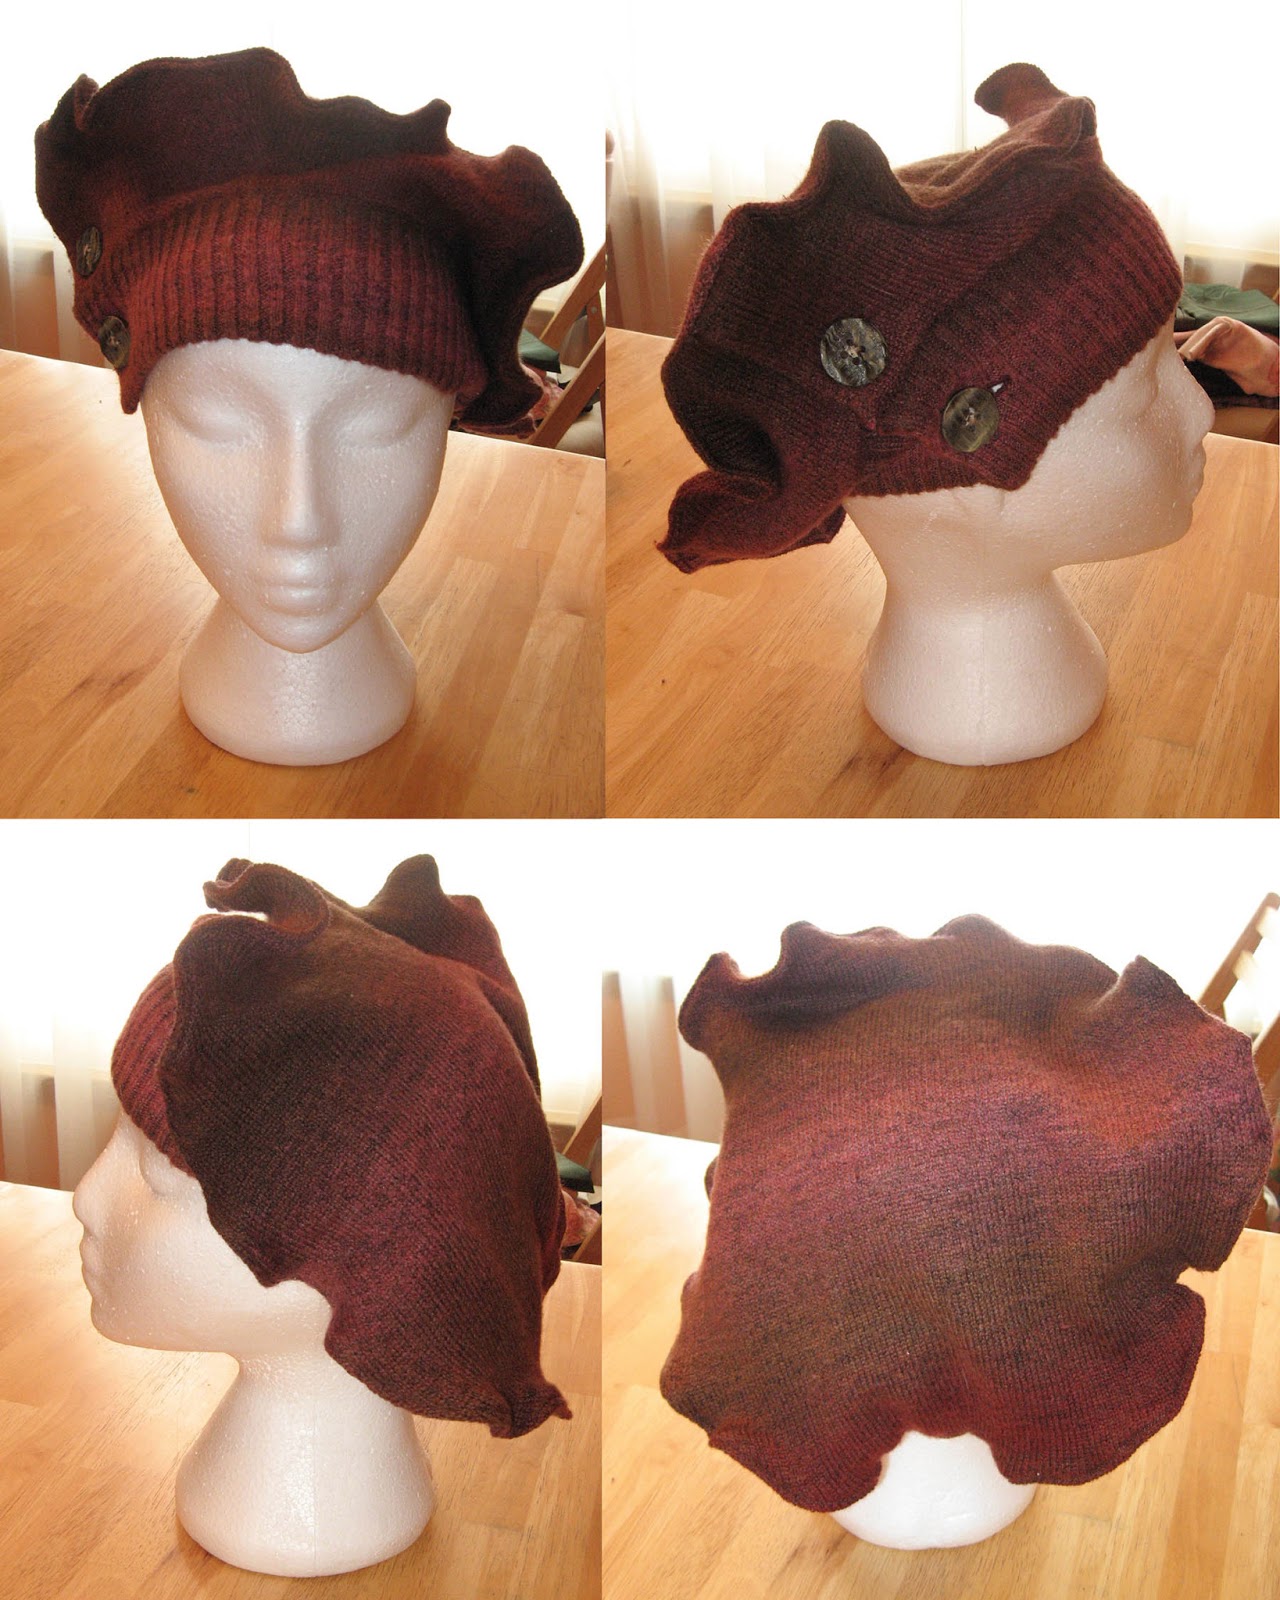
Ombre Sweater Hat


When I saw this cardigan, I loved the neck detail and the buttons. I was sure that I could flip that over and make a hat using the neckband as a headband. Didn't know how, exactly, but I was pretty sure I could do it. Plus, for $4, how could I go wrong?

Like with the cashmere hat, I cut open the seams -- but not completely! I needed some of the sweater to complete the bottom of the beret. I cut the sides open to the armpit, and the seams of the raglan sleeves a little. 


I placed the round beret pattern piece over the top of the sweater, to get a general idea of how far out I needed to cut, in this case, about three inches out from the neckband.


I couldn't find any chalk, and my tailor's pencil wasn't marking the knit, so I used a crayon.
I didn't want to pin my pattern piece to the sweater and try to cut it that way, so after I marked a few dots all around the neckline, I traced the circle on a piece of cardboard to use that for a template to mark my cut line.


Looks awful, but it worked fairly well.
I lined up the edges of my template with the dots I'd marked, tugging the sweater in place where I needed to. Pressing down hard on the cardboard, I marked the line. (Note to self: get chalk.) After the work I had to do for this, cutting the top piece was a cinch.

I had initially planned to line the top part of the hat with some extra suit lining, but decided not to after recalling what a pain in the butt the satin was from the cashmere hat. I sewed around the edge with a quarter-inch seam allowance, then did a tight zigzag between that and the edge to prevent raveling.


It ruffled the edge beautifully! I turned the hat right-side out and topstitched through the zigzag (inside), right along the edge of the hat. I wanted to stiffen it a little more.


I went around a second time in the same place, this time pulling the knit taut using both hands to encourage ruffling and reenforcing the hem.


In these photos, I had not yet done the handsewing of the buttoned cuff.

Sewn placket
In the end, I have a very funky and unique beret, that looks a little less like a beret and a little like textile art. I love that the button placket stiffens the side, so I thought I'd try to treat the shoulder seams the same way I did the crown's hem, but without the ruffling. I zigzagged up and down those seams, and what do you know - it worked! I might be able to get them even stiffer, but I don't want to mess with it when I'm happy with how it is now. My other option would be to sew in some boning, and that might be overboard.

Those seams did curl a little, but not very noticeably from the outside.
Proud of it? You bet!


I am going to need to annex that closet soon...

Tuesday, March 5, 2013

Recycled Sweater Beret


Went to Savers yesterday to look for corner shelving for the laundry room; ended up with a bag full of clothes to repurpose and no shelves. *sigh* On the other hand, I scored two cashmere sweaters for $14. I had intended to turn them both into berets, but one actually fit, so one sweater for me! I bought 4 knit tops, 3 sweaters and a sheer scarf for $30. (Shop on Mondays with their club card and save 25%.)

100% cashmere... yum!

I loved the colors of the scarf with the sweater, and wanted to try to incorporate it into the finished hat, but first I needed a hat.

I turned the sweater inside out and cut off all the seams so that I had 4 flat pieces: front, back, and sleeves. I laid out the pattern pieces to find the placement. The wider bottom piece fit on the front of the sweater, and the top went on the sweater back. The sleeve was just a tiny bit too short to accommodate the headband, so I had to find a different material for that. I used a mossy green velvet leftover from a dress Mom made my daughter a few years ago.


I needed loops to hold the scarf on the headband once the hat was finished, so I used kiwi green ribbon and machine-basted the top of the headband so I could sew it onto the hat without worrying about the ribbon.

Pinned, not yet basted.
The hat went together fairly well. The satin lining was pretty slippery against the sweater, but I was worried about raveling, so I double-stitched the outside of the beret.

Inside seam of the beret, double-stitched.

I was a bit concerned that it would make the edge too stiff, but I didn't dare clip it and risk everything falling apart. Turned out just fine.


Once the body was all sewn together, I could add my be-ribboned hatband. I double-stitched that, too, and zigzagged around the edge.

It's a little messy in there, but it won't show.
The scarf fits nicely in the loops, but it has a tendency to fall to the bottom of the loop;
I need to tack the bottom of the ribbon on the band to prevent that.


The whole thing was made in a morning. I cut apart the sweater last night, but I didn't cut the pieces until this morning. Berets are practically instant-gratification millinery. :) I'm so happy with this. It's pretty, it's warm, the scarf makes it a little different. It can be removed and a different scarf swapped in, or the hat can be worn without a scarf.


Since I already had the satin lining material, velvet for the band, ribbon and thread, this cashmere beret only cost $8. And since I have the sleeves and pieces of the front and back, I have more than enough of the sweater left over to make a pillbox. Maybe embellished with little dusty pink roses made like the ones in tutorial below, and ribbon embroidery.

http://capungmungil.blogspot.com/2011/10/diy-felt-rose-flower-tutorial.html
________________
I have to laugh. My husband just commented that if I keep making hats like this, I'll have to open a store to sell them. I told him that I'd already reached a solution: I'll annex the guestroom closet for hat storage. "Everyone should have a hat closet!" I told him. He seemed unimpressed with my genius. "You have some too!" I pointed out. Still nothing. Perhaps I merely rendered him speechless.