Tuesday, March 19, 2013

Pattern Review: Sashay Skirt

Last August, I got a pattern and some material, and planned to make a skirt from some DC Superheroine fabric. This past weekend I finally made it, and a beret to match (naturally). The Indygo Junction pattern for the Sashay Skirt could not be easier unless it sewed itself.

There is a single pattern piece, it's sized by adding panels to the trumpet skirt, and has an elastic waistband. The directions call for serging the seams, leaving them exposed, with the option of sewing them to the inside. I don't have a serger, and I don't care for the look of all those exposed seams, so I sewed them to the inside. Honestly, it took way more time to pin all those panels than it did to sew them together.

The hem is curved and I quickly discarded a rolled hem as being a huge pain in the butt. I ended up using bias tape to do an enclosed hem instead. The coordinating quarter inch tape stiffened the hem a little, making it tend to stand out a bit; it's an effect that looks quite nice. It was time consuming; my hem was nearly 6 yards around because of the number of panels I used. For all the pinning and seams that had to be sewn, I still got it done in a day.

It's a really cute skirt, hitting me just below the knee. The flared hem is flattering and the elastic waist comfortable. It moves nicely, swirling with my steps, and twirling in it flares it out without being immodest since it's straighter at the hips. The way its pieced lends itself to many different combinations of color and pattern. Make it all one fabric, or make every one different -- it's up to you and your own sense of design. I used 4 different patterned materials from a single design line from Camelot Fabrics, but this won't be the last time I make the Sashay Skirt. And because you custom size it by the number of panels, I can easily make a skirt for my daughter using that same single pattern piece, unlike with most patterns where you have to cut into a multiple-sized pattern pieces, making them useless to make another size.

NOTE: If you have a directional pattern on the material, you're going to need more fabric than the instructions call for unless you don't care if some of your panels are upside down. (One of my blue panels is -- oops!)

You can see here that the light blue panel on the left of the photo is upside down.
Lots of nice flare at the bottom.
Showing how the bias tape gave a little body to the hemline.
The bottom of the beret is of a sparkly pink material that doesn't quite match the
bias tape, but coordinates nicely with the pinks in the material.
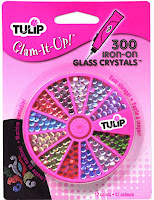
I chose to add a little bling to my skirt with hot-fix crystals, and used the assorted color pack of 300 from Tulip. Cost-wise, they were 300/$15 for 12 colors (at Joann's) vs. the Swarovski Elements 90/$10 (for two coordinating colors). Since I wanted to add them to the skirt and to the beret, and since I had a lot of colors to choose from, Tulip was the way to go, even if they're not as nice as the Swarovskis. I have added 3 to each panel of the skirt, and then finished the beret so I knew I would have enough for both, and plan to add more to the skirt.

These are not as sparkly as the
Swarovski Elements iron-on crystals,
but they're about half the cost.
I consider myself a novice seamstress. I haven't done a lot of garment sewing. I've never sewn in a zipper, and I've never done buttonholes. Pattern directions often confound me because they don't make a lot of sense, so I tend to wing it. This pattern was a piece of cake. I'm so happy that I bought it, and I'm thrilled with my results. I highly recommend it.

Wednesday, March 6, 2013

Ombre Sweater Hat


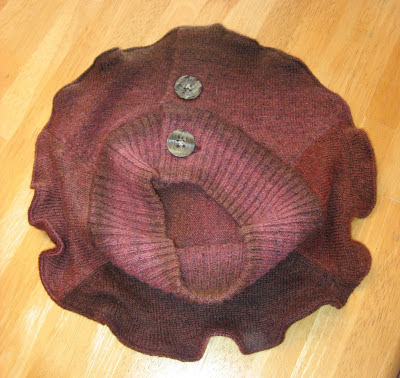
When I saw this cardigan, I loved the neck detail and the buttons. I was sure that I could flip that over and make a hat using the neckband as a headband. Didn't know how, exactly, but I was pretty sure I could do it. Plus, for $4, how could I go wrong?

Like with the cashmere hat, I cut open the seams -- but not completely! I needed some of the sweater to complete the bottom of the beret. I cut the sides open to the armpit, and the seams of the raglan sleeves a little. 


I placed the round beret pattern piece over the top of the sweater, to get a general idea of how far out I needed to cut, in this case, about three inches out from the neckband.


I couldn't find any chalk, and my tailor's pencil wasn't marking the knit, so I used a crayon.
I didn't want to pin my pattern piece to the sweater and try to cut it that way, so after I marked a few dots all around the neckline, I traced the circle on a piece of cardboard to use that for a template to mark my cut line.


Looks awful, but it worked fairly well.
I lined up the edges of my template with the dots I'd marked, tugging the sweater in place where I needed to. Pressing down hard on the cardboard, I marked the line. (Note to self: get chalk.) After the work I had to do for this, cutting the top piece was a cinch.

I had initially planned to line the top part of the hat with some extra suit lining, but decided not to after recalling what a pain in the butt the satin was from the cashmere hat. I sewed around the edge with a quarter-inch seam allowance, then did a tight zigzag between that and the edge to prevent raveling.


It ruffled the edge beautifully! I turned the hat right-side out and topstitched through the zigzag (inside), right along the edge of the hat. I wanted to stiffen it a little more.


I went around a second time in the same place, this time pulling the knit taut using both hands to encourage ruffling and reenforcing the hem.


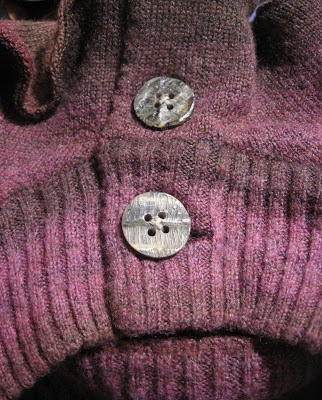
In these photos, I had not yet done the handsewing of the buttoned cuff.

Sewn placket
In the end, I have a very funky and unique beret, that looks a little less like a beret and a little like textile art. I love that the button placket stiffens the side, so I thought I'd try to treat the shoulder seams the same way I did the crown's hem, but without the ruffling. I zigzagged up and down those seams, and what do you know - it worked! I might be able to get them even stiffer, but I don't want to mess with it when I'm happy with how it is now. My other option would be to sew in some boning, and that might be overboard.

Those seams did curl a little, but not very noticeably from the outside.
Proud of it? You bet!


I am going to need to annex that closet soon...

Tuesday, March 5, 2013

Recycled Sweater Beret


Went to Savers yesterday to look for corner shelving for the laundry room; ended up with a bag full of clothes to repurpose and no shelves. *sigh* On the other hand, I scored two cashmere sweaters for $14. I had intended to turn them both into berets, but one actually fit, so one sweater for me! I bought 4 knit tops, 3 sweaters and a sheer scarf for $30. (Shop on Mondays with their club card and save 25%.)

100% cashmere... yum!

I loved the colors of the scarf with the sweater, and wanted to try to incorporate it into the finished hat, but first I needed a hat.

I turned the sweater inside out and cut off all the seams so that I had 4 flat pieces: front, back, and sleeves. I laid out the pattern pieces to find the placement. The wider bottom piece fit on the front of the sweater, and the top went on the sweater back. The sleeve was just a tiny bit too short to accommodate the headband, so I had to find a different material for that. I used a mossy green velvet leftover from a dress Mom made my daughter a few years ago.


I needed loops to hold the scarf on the headband once the hat was finished, so I used kiwi green ribbon and machine-basted the top of the headband so I could sew it onto the hat without worrying about the ribbon.

Pinned, not yet basted.
The hat went together fairly well. The satin lining was pretty slippery against the sweater, but I was worried about raveling, so I double-stitched the outside of the beret.

Inside seam of the beret, double-stitched.

I was a bit concerned that it would make the edge too stiff, but I didn't dare clip it and risk everything falling apart. Turned out just fine.


Once the body was all sewn together, I could add my be-ribboned hatband. I double-stitched that, too, and zigzagged around the edge.

It's a little messy in there, but it won't show.
The scarf fits nicely in the loops, but it has a tendency to fall to the bottom of the loop;
I need to tack the bottom of the ribbon on the band to prevent that.


The whole thing was made in a morning. I cut apart the sweater last night, but I didn't cut the pieces until this morning. Berets are practically instant-gratification millinery. :) I'm so happy with this. It's pretty, it's warm, the scarf makes it a little different. It can be removed and a different scarf swapped in, or the hat can be worn without a scarf.


Since I already had the satin lining material, velvet for the band, ribbon and thread, this cashmere beret only cost $8. And since I have the sleeves and pieces of the front and back, I have more than enough of the sweater left over to make a pillbox. Maybe embellished with little dusty pink roses made like the ones in tutorial below, and ribbon embroidery.

http://capungmungil.blogspot.com/2011/10/diy-felt-rose-flower-tutorial.html
________________
I have to laugh. My husband just commented that if I keep making hats like this, I'll have to open a store to sell them. I told him that I'd already reached a solution: I'll annex the guestroom closet for hat storage. "Everyone should have a hat closet!" I told him. He seemed unimpressed with my genius. "You have some too!" I pointed out. Still nothing. Perhaps I merely rendered him speechless.

Sunday, March 3, 2013

March's Hat: Flowers

 
We've had quite a bit of snow lately, and while we need the precipitation because of the summer drought, frankly I'm sick of shoveling the stuff. I've been dreaming about my garden, sleeping under its white fluffy blanket. And while I've been dreaming of flowers, the flowers have inspired hats.

I used a tutorial at Fleece Fun for no-sew hair flowers, but on a much larger scale. I used polyester suit lining in three colors: off-white, pale pink and medium pink, and make four circles in each color, each a little smaller than the last, and employed Angel's method for burning the edges to create a curled and ruffled effect.


I made an apple-green satin beret (stiffened a bit with interfacing), and sewed around the outside of the crown to make it more stiff.


All of the off-white layers were machine-stitched together...
...then the light pink layers were machine-stitched to that...
...and three of the darker pink layers were machine-stitched to that,
making eleven layers.


The layers of petals were sewn to the beret.
The final pink petal was sewn on with the glass beads that make the flower's center.


I am so pleased with the way this turned out. It's probably as close to couture as I can manage at this point in my millinery self-education. It's considerably more feminine and delicate than anything I typically wear, so I'm not certain at this point what I'll wear with it, but I do love this hat.

(Not So) Quickie Beret


I wanted to make a beret that was reversible, and none of the pages I saw online were quite what I needed. I had a flame-print piece of a fat quarter (not even a whole fat quarter, but I didn't need it all) and decided to pair it with a copper-colored liquid lamé.

I cut the largest circle I could from the cotton, about 18 inches in diameter, and cut another piece of the metallic knit. I did a little math to find the circumference* of that circle (56.4 inches). I needed to pleat or gather the edges to get something that I could wear. I subtracted 22 inches (head size) from the circumference, and got 34 (rounded down). I could make 34 1-inch pleats, or 17 2-inch pleats to get the band circumference I needed. I rounded the 17 to 16 for an even number, and marked 8 points on my circle, then marked the middle of each of those points to get 16. I made my pleats and ended up with an inner circumference of 24 inches -- too big for my head, but figured I could adjust it when I put the band on. I basted them together to keep the pleats as flat as possible.

I used the band pattern piece from my trusty McCall's beret pattern, and pinned it onto my beret, trying to be careful and cover the basted seam of the crown piece. (I didn't 100% succeed. I had to fix a couple of places where I missed when I flipped it inside out.) The band is a little off-kilter, but it's black velvet, so it doesn't show too badly.

I'm calling this experiment a success. I managed to do what I wanted to do: create a reversible beret. I will have to play with the math a little more on any hats I make like this going forward, and it would be worth it to make a pattern piece with the pleat points marked. (Also, liquid lamé is a bit of a pain to work with.) The hat is a little smaller than the others I've made, but that was the constraint of the cotton scrap. It's also pretty floppy; that could be fixed by adding a lightweight interfacing between the layers to give it a little more body. A larger circumference hat would require more, or larger, pleats.

* To figure the circumference of a circle, multiply the diameter by π (3.1415). 


Because of some of the trouble I ran into with getting the pleats even, the pleats basted, and getting the band to completely cover the basting stitches, this wasn't as "quickie" as it might have been. But it worked. Going forward, I know I can do this again, and get the results I want. My concept worked. (Yay, me.) And since this was just messing around to see if I could do it, I don't have pics of the progress, only the finished piece. When I make another, I'll do a full tutorial of my process.

Friday, March 1, 2013

Sesame Street Beans Hack

Little Chrissy & the Alphabeats with Grover
A reader pointed out to me that I said I'd post pics and pattern pieces for the Little Chrissy and the Alphabeats dolls I made for my daughter for Christmas. Aaaand I can't find the pattern pieces. *sigh* I'll have to redraft them, but in the meantime, here's a look at what I did and how.

The dolls are a mix of hand and machine sewing.

Each piece was marked with how many I had to cut of each color. The folded part of the top shoe piece shows where I made a dart, to get the right shape of the foot. The chest piece shows the center, where I cut a slit to insert a small triangle of white to show the undershirt the characters are wearing under their collared shirt. The collars were triangles I sewed in, I did not make a mini collared shirt. I also didn't make a pattern piece for those.
I used Grover to approximate the pattern pieces since he's "naked" and I could see all the seams clearly. I should have made the eyes larger, since my Alphabeats look a little terrifying, but my daughter loves them and has not stopped talking about them, and the others she wants, since Christmas. (No, really, she won't stop.)

Little Chrissy only has black dots for eyes, and I used a pipe cleaner to make his glasses. Hair for the dolls came from samples purchased from http://www.fabricempire.com/faux-fur-fabric.aspx. You can also see the little dart in his chin that I made to round out his face more.

Completed shoes and one completed leg.

I made the shoes first. Those were filled with plastic beans once the legs were sewn on, and the legs were filled with polyfill not quite to the top. I sewed the belly and butt pieces so I had front and back sides, then pinned the legs into that (right sides facing) so that when I turned it right-side out, the legs would be securely sewn in.

The legs are quilting cotton, patterned to look like denim.
This was the first lower body I made, before I figured out a better way to sew the legs in.
Once the torsos were sewn on, I filled the butt part with beans, then more polyfill. The arms were sewn into the body pieces, and contained no beans. The only parts containing beans are the shoes and the butt.

The heads were sewn together, then sewn on once the torsos were attached to the lower bodies.
Closeup of the pink guy's face. He was the first one I made, and a little lopsided. You can sort of see the dart in his chin.
Except for his face and hair, he's done.
I made the noses from circles of felt, gathered sort of like how you make a yoyo, only on a smaller scale. Little Chrissy's nose is an oval, so I used an oval instead of a circle. The eyes are circles of flannel with Fray-Checked edges, the pupils were added with Scribbles fabric paint, and Fabric Fusion (fabric glue) to attach them. The mouths are just rectangles of red felt sewn into the seam.

They're not perfect, but I'm proud of them. I know better how do do things, what worked and what didn't, etc. And that's a good thing, because she's already written her letter to Santa asking for Dr. Thad and the Medications. (And Mick Swagger and the Cobblestones, and Little Jerry and the Monotones, and -- lord knows why -- The Grand High Triangle Lover.) When I do make all those guys, I will take better photos and try to do a decent tutorial.