It's been a wretched several months. Various issues cropped up in my life, and those things spelled stress and a general creative drought that's lead to me staring at Sherlock Hemlock with distaste and loathing.
Here we are in December. Once again, my daughter is expecting "Santa" (who she knows very well is me) to come through with all that she wants in the world. Of course she doesn't want any of the Sesame Street bands I already have cut out and ready to sew, that she asked for last year! She wants Colambo and Ovejita, characters who will require new pieces drafted, and a nickel-sized fedora made for Colambo! [That dull thumping sound is me, pounding my head on the wall.] So why is Sherlock the focus of my loathing? He is going to be my basic model as I draft the pattern pieces I need for Colambo's trenchcoat. I have to get the pieces drafted, and get him back in The Kid's room before she gets home from school and realizes I've been messing with her stuff. Good grief, I hate Christmas...
With that same breath, I want to make sepia-toned ornaments for a wall tree. Making ornaments is my favorite part of the holiday, now; small works of art that don't take a lot of time (usually). And now I don't even have time for that. Perhaps after the madness of this holiday, I can do something for next year.
I'm also dying to get back to my hatmaking. I found some more great thrifted fabric that I can't wait to start working with, and I want to sew another skirt soon, but I need to take in my others before I sew new ones. (Hats are nice, hardly ever have to worry about the size of your hatband changing.)

Showing posts with label Christmas. Show all posts
Showing posts with label Christmas. Show all posts
Thursday, December 11, 2014


Tuesday, December 10, 2013
Betty Crocker Angel
For my kitchen tree, I needed the perfect topper. I decided to make an "angel" using the first Betty Crocker portrait from 1936.
I used a seven-inch paper cone (from Michael's), the portrait (adjusted for size), a felt snowflake that looked like a halo (from Michael's), a photo of my personal copy of the 1950 Betty Crocker Picture Cook Book (altered in Photoshop), paint, and hot glue.
I painted the cone red. Then I printed out different sizes of the portrait to decide which one I wanted to use. Making the wings was the trickiest, because I didn't want to distort the covers too much, but I needed them to fit the cone at an angle. The wings and portraits were printed on white cardstock.
I spray-sealed the cover/wings, and her portrait and let them dry before I glued anything. I scored the wings so they would bend back slightly from where they were glued, and used the edge of my kitchen counter to gently round the spine where it would attach to the cone. That way I wasn't fighting the stiffness of the cardstock when I glued it down. I glued the snowflake-halo (off-white, so it fit with the cover perfectly) to the back of her portrait, then glued that to the cone, centered over the wings.

The jacket she's wearing in the portrait didn't print as vividly red as my paint, so I ended up painting a very light coat of the same red over her jacket, so it would match the cone. I also added a tiny bit of the same red to her lips.

The ribbon is held in place with tape, while I decide if I love it or not. I'm pretty sure I do, but I wish they were longer, and went to the bottom of the tree's branches. (I might get more ribbon to do that; that was one spool, cut in five pieces. I'll need two to make them as long as I want them to be.)

I want to include the other Betty Crocker portraits as ornaments somehow, but I haven't decided exactly how yet... As smaller angels? As cameos? I'll have to see what I find at Joann's when I go. (I need more felt for the candies and cupcakes.)
I love the way she turned out. The width of her shoulders in relation to the cone is perfect, the color of the cone is rich and wonderful, touching up the color on her jacket really made it blend with the cone, and the book cover wings are just awesome. Even the snowflake halo coordinates with the design on the cover smoothly. Everything came together exactly as I saw it in my head. And how often does that happen??
 |
| Artist: Neysa McMein |
I painted the cone red. Then I printed out different sizes of the portrait to decide which one I wanted to use. Making the wings was the trickiest, because I didn't want to distort the covers too much, but I needed them to fit the cone at an angle. The wings and portraits were printed on white cardstock.
 |
| Altered in Photoshop: The finished wings are 10 inches wide and the widest point, and the spine is 5 inches tall. |
I spray-sealed the cover/wings, and her portrait and let them dry before I glued anything. I scored the wings so they would bend back slightly from where they were glued, and used the edge of my kitchen counter to gently round the spine where it would attach to the cone. That way I wasn't fighting the stiffness of the cardstock when I glued it down. I glued the snowflake-halo (off-white, so it fit with the cover perfectly) to the back of her portrait, then glued that to the cone, centered over the wings.

The jacket she's wearing in the portrait didn't print as vividly red as my paint, so I ended up painting a very light coat of the same red over her jacket, so it would match the cone. I also added a tiny bit of the same red to her lips.

The ribbon is held in place with tape, while I decide if I love it or not. I'm pretty sure I do, but I wish they were longer, and went to the bottom of the tree's branches. (I might get more ribbon to do that; that was one spool, cut in five pieces. I'll need two to make them as long as I want them to be.)

I want to include the other Betty Crocker portraits as ornaments somehow, but I haven't decided exactly how yet... As smaller angels? As cameos? I'll have to see what I find at Joann's when I go. (I need more felt for the candies and cupcakes.)
I love the way she turned out. The width of her shoulders in relation to the cone is perfect, the color of the cone is rich and wonderful, touching up the color on her jacket really made it blend with the cone, and the book cover wings are just awesome. Even the snowflake halo coordinates with the design on the cover smoothly. Everything came together exactly as I saw it in my head. And how often does that happen??
Monday, December 9, 2013
Kitchen Tree
Because I am crazy, when I finished my daughter's second round of Sesame Street "deep cut" muppet dolls*, rather than celebrating by taking the day off and enjoying the fact that they were done, I went out and bought another (small) Christmas tree to decorate.
I found a pure white three-foot tree (not iridescent or glittery, just white) and a white wire string of LED lights (multicolor). I already had a plan to make the ornaments for it, using recipes cut from vintage magazines and pasted onto oval paper maché things. I bought paper cupcake cups in an argyle pattern, harlequin patterned ribbon in lime and cherry, and from the dollar store: lime plastic measuring spoons, cups, a tea ball, and four hot pads in lime and cherry. I already had on hand four large copper cookie cutters, another tea diffuser, and two small wooden spoons that were Easy Bake oven accessories (that my daughter never used).
Here's how I made the recipe ornaments:
1. Paint the edges and a bit of the surface you're gluing on.
2. Make a template by tracing the edge of the ornament(s) you're using and cutting out the center. (This will be your guide to see if the recipe you want to use will fit.)

3. Find a recipe to use. (I used ads from vintage December issue women's magazines.)
4. Use a template to see if the recipe will fit on your ornament(s).


5. Trace the outline of the ornament onto the recipe as a cutting guide. (The ornaments I used were not perfectly uniform, so I traced the ornament I was using onto the recipes.)

6. Cut out your pieces, checking first to make sure there isn't anything on the back you want to save.

7. Play with the placement, determine if you need more paint, and glue your pieces down. (I used a glue stick.)
8. After the glue dries, spray sealant on the ornaments. Embellish as desired.
Materials needed: Paper maché ornaments (bought at Michael's), vintage magazines, paper (for a template), paint, glue stick, clear spray sealer, embellishments (scrapbook paper, stickers, ribbon, glitter, etc.).
All of the ornaments I made have a photo of the thing the recipe is for, because I love the look of those old magazine photos. You could also use photocopies/scans of family recipes (never, ever use originals, unless you're writing a new one just for this project).
I am still making ornaments for this tree. I have some little felt chocolates I'm making, and plan to make some cupcakes, too. More on those when I'm finished...
________________________
* This time, it's Dr. Thad and the Medications. The dolls turned out great, but they're slightly out of scale with Little Chrissy and the Alphabeats, because I had to recreate the pattern. I hope she doesn't notice and insist that Little Chrissy et al. be remade...
I found a pure white three-foot tree (not iridescent or glittery, just white) and a white wire string of LED lights (multicolor). I already had a plan to make the ornaments for it, using recipes cut from vintage magazines and pasted onto oval paper maché things. I bought paper cupcake cups in an argyle pattern, harlequin patterned ribbon in lime and cherry, and from the dollar store: lime plastic measuring spoons, cups, a tea ball, and four hot pads in lime and cherry. I already had on hand four large copper cookie cutters, another tea diffuser, and two small wooden spoons that were Easy Bake oven accessories (that my daughter never used).
Here's how I made the recipe ornaments:
1. Paint the edges and a bit of the surface you're gluing on.
 |
| I used 12 of these; 6 red, 6 green, and each color had 3 of each shape. (3 green ovals, 3 red ovals, 3 green rectangles, 3 red rectangles) |
2. Make a template by tracing the edge of the ornament(s) you're using and cutting out the center. (This will be your guide to see if the recipe you want to use will fit.)

3. Find a recipe to use. (I used ads from vintage December issue women's magazines.)
 |
| December 1957 Family Circle |


5. Trace the outline of the ornament onto the recipe as a cutting guide. (The ornaments I used were not perfectly uniform, so I traced the ornament I was using onto the recipes.)

6. Cut out your pieces, checking first to make sure there isn't anything on the back you want to save.

7. Play with the placement, determine if you need more paint, and glue your pieces down. (I used a glue stick.)
 |
| The Pet Milk can covered up too much of the recipe. I used it on the other side instead. |
8. After the glue dries, spray sealant on the ornaments. Embellish as desired.
 |
| Finished, front and back. Back has a bit of paper tape as embellishment. |
 |
| On the tree, with some of the other ornaments visible. |
 |
| Here's a few more, front/back views. You can see I used paper to cover the ornament on the left view, top right, and then pasted the recipe on top of that. |
I am still making ornaments for this tree. I have some little felt chocolates I'm making, and plan to make some cupcakes, too. More on those when I'm finished...
________________________
* This time, it's Dr. Thad and the Medications. The dolls turned out great, but they're slightly out of scale with Little Chrissy and the Alphabeats, because I had to recreate the pattern. I hope she doesn't notice and insist that Little Chrissy et al. be remade...
Sunday, December 8, 2013
"Apron" Curtains
I love vintage aprons. I don't want to use them as a window valance, because the afternoon sun would destroy them. I have a small wire frame "mannequin" that I use to display them one at a time in my dining room.
Mom gave me the idea to use the basic shape of an apron as a valance, but made with new fabric. I decided to try it, and even found some vintage-look Christmas prints at Joann's. I made a pattern piece for a gently-curved half apron, sized to fit my window. Each of the "aprons" is 20 inches wide at the top, 25 inches wide at the bottom, and 15 inches long, not including the rod pocket, which adds about 1.5 inches to the length.
Basically, I hemmed the sides and the bottom, sewed the contrasting rod pocket to the top, added a matching decorative pocket to the left front, and sewed on rick rack. I did it in a single morning.
Note that they are not as full as more traditional curtains would be. Usually, you want your fabric to be about double the width of your window, but I wanted the apron shapes to be apparent. My window is 72 inches wide, the width (at the top) of my valance is 100 inches. It has a little fullness, but isn't bulky.
I also didn't sew all of the pieces together; each of those "aprons" is a separate piece, that can be rearranged and maybe more importantly, can be washed separately. I did prewash the material, but with all those colors with the off-white fabric...
I went with three solids and two print (that were the same background color) so that it wouldn't be too busy. Each apron has a coordinating rod pocket and front pocket; for the five aprons, there are eight different fabrics. (In part because I couldn't decide between some of the prints, so I found a way to use most of them.) They overlap on the corners, showing off the decorative pocket. If I was feeling really ambitious, I suppose I could put something lightweight in the pockets, like little artificial flowers, or something, but I like they way it looks as is.
I'm so pleased with the way this turned out, I'm going to make more for year-round use, using more retro prints.
Mom gave me the idea to use the basic shape of an apron as a valance, but made with new fabric. I decided to try it, and even found some vintage-look Christmas prints at Joann's. I made a pattern piece for a gently-curved half apron, sized to fit my window. Each of the "aprons" is 20 inches wide at the top, 25 inches wide at the bottom, and 15 inches long, not including the rod pocket, which adds about 1.5 inches to the length.
Basically, I hemmed the sides and the bottom, sewed the contrasting rod pocket to the top, added a matching decorative pocket to the left front, and sewed on rick rack. I did it in a single morning.
 |
| Yes, Virginia, that is a Kitchen Witch. I didn't set out for it to, but the new valance coordinates with her. |
Note that they are not as full as more traditional curtains would be. Usually, you want your fabric to be about double the width of your window, but I wanted the apron shapes to be apparent. My window is 72 inches wide, the width (at the top) of my valance is 100 inches. It has a little fullness, but isn't bulky.
I also didn't sew all of the pieces together; each of those "aprons" is a separate piece, that can be rearranged and maybe more importantly, can be washed separately. I did prewash the material, but with all those colors with the off-white fabric...
I went with three solids and two print (that were the same background color) so that it wouldn't be too busy. Each apron has a coordinating rod pocket and front pocket; for the five aprons, there are eight different fabrics. (In part because I couldn't decide between some of the prints, so I found a way to use most of them.) They overlap on the corners, showing off the decorative pocket. If I was feeling really ambitious, I suppose I could put something lightweight in the pockets, like little artificial flowers, or something, but I like they way it looks as is.
I'm so pleased with the way this turned out, I'm going to make more for year-round use, using more retro prints.
 |
| nighttime |
Friday, March 1, 2013
Sesame Street Beans Hack
 |
| Little Chrissy & the Alphabeats with Grover |
The dolls are a mix of hand and machine sewing.
 |
Each piece was marked with how many I had to cut of each color. The folded part of the top shoe piece shows where I made a dart, to get the right shape of the foot. The chest piece shows the center, where I cut a slit to insert a small triangle of white to show the undershirt the characters are wearing under their collared shirt. The collars were triangles I sewed in, I did not make a mini collared shirt. I also didn't make a pattern piece for those.
|
 |
| Little Chrissy only has black dots for eyes, and I used a pipe cleaner to make his glasses. Hair for the dolls came from samples purchased from http://www.fabricempire.com/faux-fur-fabric.aspx. You can also see the little dart in his chin that I made to round out his face more. |
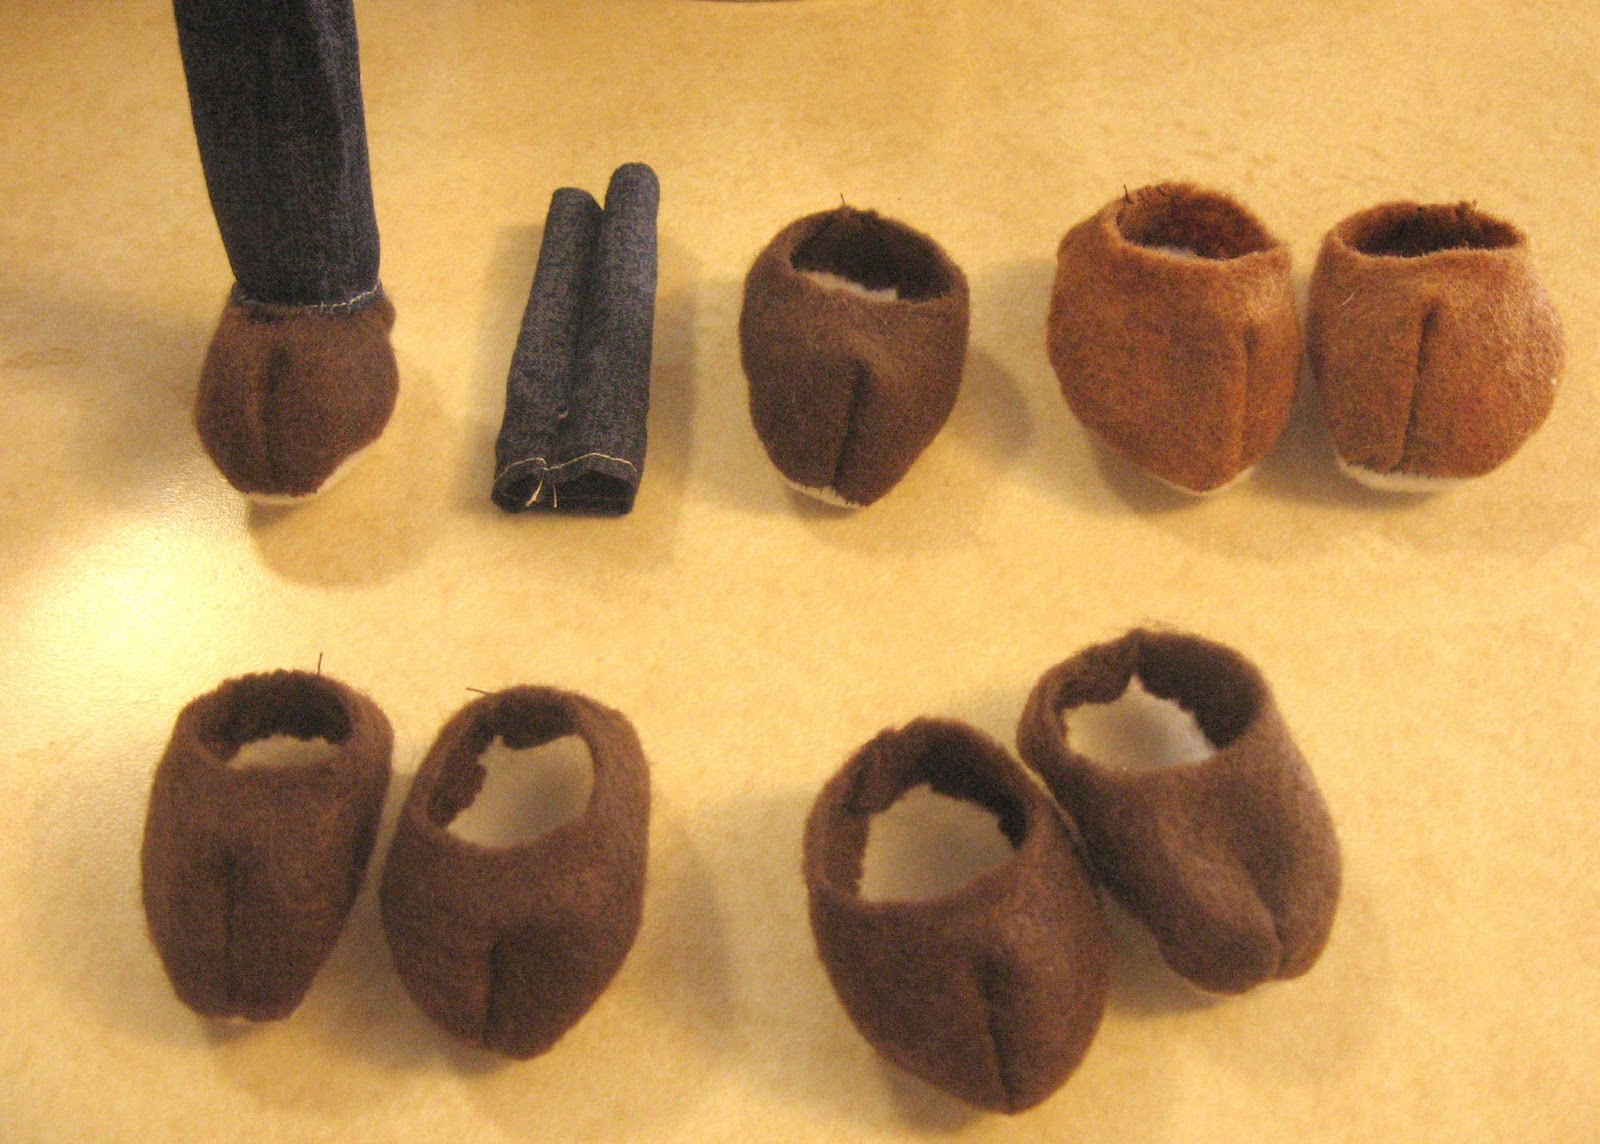 |
| Completed shoes and one completed leg. |
I made the shoes first. Those were filled with plastic beans once the legs were sewn on, and the legs were filled with polyfill not quite to the top. I sewed the belly and butt pieces so I had front and back sides, then pinned the legs into that (right sides facing) so that when I turned it right-side out, the legs would be securely sewn in.
 |
| The legs are quilting cotton, patterned to look like denim. |
 |
| This was the first lower body I made, before I figured out a better way to sew the legs in. |
 |
| The heads were sewn together, then sewn on once the torsos were attached to the lower bodies. |
 |
| Closeup of the pink guy's face. He was the first one I made, and a little lopsided. You can sort of see the dart in his chin. Except for his face and hair, he's done. |
They're not perfect, but I'm proud of them. I know better how do do things, what worked and what didn't, etc. And that's a good thing, because she's already written her letter to Santa asking for Dr. Thad and the Medications. (And Mick Swagger and the Cobblestones, and Little Jerry and the Monotones, and -- lord knows why -- The Grand High Triangle Lover.) When I do make all those guys, I will take better photos and try to do a decent tutorial.
Wednesday, December 14, 2011
Miniature Recipe Box
I wanted to make recipe box ornaments, but I knew a full-size box would be too big and heavy. Using a metal box as my guide, I made a template that can be printed out on 8.5 x 11" paper. If you print the template directly onto the paper/cardstock you're using, be sure to print it on the BACK side of the paper, so the lines won't show. Or you can print it on heavy cardstock and use the template to trace the lines onto your paper.
The finished box is about 2 7/8 inches wide, 1 7/8 inches tall and 1 3/4 inches deep.

Cut out your paper. On the template, the dashed lines are folding guides; solid lines are to be cut. If you fold all of the pieces before you start to assemble it, your life will be much easier!
 I used double-sided tape, but you could use a glue stick if you hold until it sets. Fold in the top flaps (shown above), taping them to the sides of the lid.
 This shows the top flaps folded and taped to the lid sides, forming a boxy shape.
 Fold in the flaps on the three sides of the lid.
 Tape (or glue) the smaller back flaps to the sides of the base, then fold in the larger flaps.
 Back flaps are in place; folding up the larger flaps, roughing in the bottom of the box.
 Once you have your sides in place, fold in the small flaps (taping or gluing them down), just as with the lid.
The box doesn't close very well since it's not hinged like the metal recipe box I used for inspiration, but I'll leave that up to your creativity - tie it closed with a ribbon, use a brad and string, leave it open... so many ways to play with this little box!
Download the template here. You are free to use it and share it, with attribution please (I worked hard on it, getting credit is a small thing to ask), but you may not sell the template or include it with other works for sale - it isn't yours to sell.
The finished box is about 2 7/8 inches wide, 1 7/8 inches tall and 1 3/4 inches deep.

Cut out your paper. On the template, the dashed lines are folding guides; solid lines are to be cut. If you fold all of the pieces before you start to assemble it, your life will be much easier!
 |
| Finished lid |

The box doesn't close very well since it's not hinged like the metal recipe box I used for inspiration, but I'll leave that up to your creativity - tie it closed with a ribbon, use a brad and string, leave it open... so many ways to play with this little box!
Download the template here. You are free to use it and share it, with attribution please (I worked hard on it, getting credit is a small thing to ask), but you may not sell the template or include it with other works for sale - it isn't yours to sell.
Friday, December 9, 2011
A Million Ways to Procrastinate
I signed up at Pinterest in June as part of 30 Days of Creativity, but didn't really do much with it after the month was done. A friend of mine started using it, which made me take a second look at the site. And I have been using it to daydream about new projects ever since...
Ever since I got over my initial horror of destroying books, working on my own altered book, I've been looking at them with new eyes. So many books are discarded! I would never destroy something valuable (collectible, rare, etc.), but there's an awful lot of books that don't fall into that category. If you just look at the people who've tagged recycled books on Pinterest, there's tons of amazing, creative and fun projects. There's Christmas ornaments in particular I am dying to make. Currently, my vintage aluminum tree is set up in the library... but wouldn't it be awesome to have a book-themed tree?
We're working on finishing up our unpacking and organizing (we moved in last July) in the basement, where a lot of boxes ended up, yet to be unpacked. I know how I want to decorate that space, and Pinterest is giving me a lot of inspiration there, too.
Whatever you can think of, there's probably someone at Pinterest who's thought of it, too. And you will find a million ways to procrastinate.
Ever since I got over my initial horror of destroying books, working on my own altered book, I've been looking at them with new eyes. So many books are discarded! I would never destroy something valuable (collectible, rare, etc.), but there's an awful lot of books that don't fall into that category. If you just look at the people who've tagged recycled books on Pinterest, there's tons of amazing, creative and fun projects. There's Christmas ornaments in particular I am dying to make. Currently, my vintage aluminum tree is set up in the library... but wouldn't it be awesome to have a book-themed tree?
We're working on finishing up our unpacking and organizing (we moved in last July) in the basement, where a lot of boxes ended up, yet to be unpacked. I know how I want to decorate that space, and Pinterest is giving me a lot of inspiration there, too.
Whatever you can think of, there's probably someone at Pinterest who's thought of it, too. And you will find a million ways to procrastinate.
Sunday, November 27, 2011
Bah! Humbug!
I have a confession: I am beginning to loathe Christmas. I worked for several years in retail until I had my daughter, and even worked on and off part time after that. I have enough retail holidays under my belt to make anyone hate this season. The only things that keep me from chucking it all are #1: My daughter - she's 14, autistic, loves getting presents and going shopping. #2: I like Christmas decorations, I just really hate seeing them before Hallowe'en! #3: I like making them.
I suppose what I really have issue with are the mad, materialistic crowds of people, the fact that the holiday is encroaching steadily on my favorite holiday (Hallowe'en), and the expense of it all! I can understand that some holiday things need to be available before Thanksgiving; if you're making a Christmas quilt (etc.), you have to have the themed fabric well in advance. But the ceramic villages, the ornaments, and the candy for cripes' sake! does all that need to be out on the sales floor before the jack o'lanterns get moldy? (Here's a hint: NO!!!)
If I could manage to stay in my home until January, I think I'd be the happiest camper in the known universe. Alas, I'll have to go to the grocery store, run various errands, do a little gift shopping, whether I want to or not... I just want to be Howard Hughes (without the crazy fingernails or the tissue boxes on my feet) for a smidge over a month - is that too much to ask?
I suppose what I really have issue with are the mad, materialistic crowds of people, the fact that the holiday is encroaching steadily on my favorite holiday (Hallowe'en), and the expense of it all! I can understand that some holiday things need to be available before Thanksgiving; if you're making a Christmas quilt (etc.), you have to have the themed fabric well in advance. But the ceramic villages, the ornaments, and the candy for cripes' sake! does all that need to be out on the sales floor before the jack o'lanterns get moldy? (Here's a hint: NO!!!)
If I could manage to stay in my home until January, I think I'd be the happiest camper in the known universe. Alas, I'll have to go to the grocery store, run various errands, do a little gift shopping, whether I want to or not... I just want to be Howard Hughes (without the crazy fingernails or the tissue boxes on my feet) for a smidge over a month - is that too much to ask?
Thursday, January 8, 2009
Xmas Fabric
Here are all the fabrics for the star-shaped vintage tree skirt I have planned:

I'm considering appliquéing the Santas onto the green - or it may be too much (trouble, time, pattern).

And this is the candle fabric I couldn't resist, but don't have plans for. It's the least red of all the red fabrics, having a pink cast to it.

The pattern calls for sewing gold rick rack onto the tree skirt, and I'm considering that, too. Vintage pattern, vintage-inspired fabrics, vintage-style embellishment... all to go under my vintage aluminum tree! Stockings will also be made from four of the five reds under the tree, accented with the solid green, with cuffs.
Currently, the only fly in my eggnog is the fact that the pinup skater material has a much larger pattern than the others. I think it will be fine, but I wish that design was a little more on scale with the others. Nothing's perfect, right?

I'm considering appliquéing the Santas onto the green - or it may be too much (trouble, time, pattern).

And this is the candle fabric I couldn't resist, but don't have plans for. It's the least red of all the red fabrics, having a pink cast to it.

The pattern calls for sewing gold rick rack onto the tree skirt, and I'm considering that, too. Vintage pattern, vintage-inspired fabrics, vintage-style embellishment... all to go under my vintage aluminum tree! Stockings will also be made from four of the five reds under the tree, accented with the solid green, with cuffs.
Currently, the only fly in my eggnog is the fact that the pinup skater material has a much larger pattern than the others. I think it will be fine, but I wish that design was a little more on scale with the others. Nothing's perfect, right?
Wednesday, January 7, 2009
Another Tree Skirt
Decorating for the Yule holiday used to be something I relished. The last few years has brought out the Grinch in me, and I haven't done as much. That said, I have a small tree, actually purchased when I was in college (Mom didn't think my dorm room should be tree-free), and is only 3 feet tall. I've been using holiday napkins tucked around the base as a tree skirt, but they're a deep green and red plaid, and the tree is "Victorian" in theme with pink and mauve ribbons, pearl garland, maroon flowers, and ornaments I only use on this tree. So... because I'm insane (haven't I mentioned that??) I decided to crochet a tree skirt for it.
Here's the beginning of the round I'm making. It's just a shell stitch (the only one I've mastered, frankly), using, left to right, Moda-Dea Dream "Leaf," Patons Brilliant "Crystal Cream" and Dream "Raspberry."


The raspberry-colored yarn isn't nearly as red as it appears in these photos, raspberry is definitely the way I would describe the color, and the green is a soft sage. The cream yarn is sparkling with gold strands. I plan to weave a strand of tiny pearls (think bridal aisle) into the completed tree skirt, at the outside edge. I should be able to finish this WIP in a day or two. Don't you love quickies? :D
The lump in the top of the ring is a goof I had to fix. Somehow, my shells got twisted as I made my way around. Oops. Fortunately, it will be right at the base of the tree, and invisible. Also fortunate, the Dream yarn is pretty lightweight, so the bulk isn't anything like what it would have been if I was using worsted weight. I COULD have undone it and started over, but I didn't see the need, considering where the mistake is.
Here's the beginning of the round I'm making. It's just a shell stitch (the only one I've mastered, frankly), using, left to right, Moda-Dea Dream "Leaf," Patons Brilliant "Crystal Cream" and Dream "Raspberry."


The raspberry-colored yarn isn't nearly as red as it appears in these photos, raspberry is definitely the way I would describe the color, and the green is a soft sage. The cream yarn is sparkling with gold strands. I plan to weave a strand of tiny pearls (think bridal aisle) into the completed tree skirt, at the outside edge. I should be able to finish this WIP in a day or two. Don't you love quickies? :D
The lump in the top of the ring is a goof I had to fix. Somehow, my shells got twisted as I made my way around. Oops. Fortunately, it will be right at the base of the tree, and invisible. Also fortunate, the Dream yarn is pretty lightweight, so the bulk isn't anything like what it would have been if I was using worsted weight. I COULD have undone it and started over, but I didn't see the need, considering where the mistake is.
Sunday, December 28, 2008
Revised Tree Skirt, Stockings
A couple of things happened today to make me revise my plans for that star-shaped tree skirt: 1) eQuilter sold out of the green fabric (the one with the ornaments on it), and 2) I didn't want to chase all over hell trying to find it. Talking to Mom about it, I decided and she agreed that plain, solid green might serve me better than adding yet another pattern to a design that will already have 5 different patterns on red backgrounds. So I got some plain green cotton... and a vintage Santa on green, and some retro candles on red... It was 75% off! I couldn't resist! NO IDEA what will become of it, but it's definitely a retro thing going on, even if the years don't much match up. I may use the Santas as appliqués on the solid green. It looks like old 1940s wrapping paper - it's great! Same with the candles, only not as youthful. Don't know what I'll do, but I'll use it for something. Eventually.

I resized the bottom of the paw until it met the sides of the regular stocking. Then I resized the paw pads to allow for a 1/4" seam allowance that the original did not have. Now the two patterns will be very similar in shape and size, since all I did was modify the foot of the stocking. I'll use the solid green for a cuff on both patterns, and for the paw pads on the dog's stocking. Since the first stockings I made in college for my sweetie and me were hand-sewn, doing these on a machine should be a snap.
For the stockings, I found a McCalls pattern (free!) that I liked, and a paw print stocking at FamilyFun that I thought was cute. Only problem was, they were two different sizes, and frankly I thought the paw was too big anyway. Through the miracle of Photoshop, I spliced the two together, creating this:

I resized the bottom of the paw until it met the sides of the regular stocking. Then I resized the paw pads to allow for a 1/4" seam allowance that the original did not have. Now the two patterns will be very similar in shape and size, since all I did was modify the foot of the stocking. I'll use the solid green for a cuff on both patterns, and for the paw pads on the dog's stocking. Since the first stockings I made in college for my sweetie and me were hand-sewn, doing these on a machine should be a snap.
I have hit another snag, however. The pattern piece for the tree skirt is about 26" long. The half-yard of the snowman fabric I ordered is too short, and the pattern of the material is not going to rotate 90 degrees and look right. So I either need to find another red background retro print to go with the others, or order another 3/4 yard of that snowman. *sigh*
Tuesday, December 16, 2008
Wild Hares
Herein lie my fevered imaginings for a new tree skirt... because I can't make new stockings without a new tree skirt!
The idea is to use this 5-point star, because it's unusual, and because I like it. I'll split each diamond in half, and alternate red and green pieces, because the reds won't match exactly. I considered white, but frankly, it would be filthy instantly. Green is the logical choice. I'll use the same green for each, but the reds will all be different.
The idea is to use this 5-point star, because it's unusual, and because I like it. I'll split each diamond in half, and alternate red and green pieces, because the reds won't match exactly. I considered white, but frankly, it would be filthy instantly. Green is the logical choice. I'll use the same green for each, but the reds will all be different.
Because the tree skirt is for the aluminum tree, I won't have a slit in it, just a hole for the "trunk."

 for my daughter,
 for me,
 for my husband,
  for the dog,
 to round out the 5 red fabrics (when I received this fabric, the red isn't nearly as orange as this image suggests, thank goodness!),
  and the green is self-explanatory.
I'll make stockings from the first 4 red patterns, and maybe accent the top with a cuff of green. I haven't decided yet. This will be for next year's tree, as there is no screamin' way I'll be able to get this done in a week, and that assumes that I'd even get everything before Xmas; I have to order all of them but the puppies (which I got today).
 for my daughter, for me,
 for my husband, for the dog, to round out the 5 red fabrics (when I received this fabric, the red isn't nearly as orange as this image suggests, thank goodness!), and the green is self-explanatory.
I'll make stockings from the first 4 red patterns, and maybe accent the top with a cuff of green. I haven't decided yet. This will be for next year's tree, as there is no screamin' way I'll be able to get this done in a week, and that assumes that I'd even get everything before Xmas; I have to order all of them but the puppies (which I got today).
Found My Xmas Spirit!
(It was hiding in a pile of laundry.)
Here's my aluminum tree. Actually, it's my second one, but this one's in better shape. It's a long and uninteresting story as to why I have one of these antiques in the first place, so I won't bore you with that.
 The color wheel is different from most. Each quarter wedge has a stripe of all four colors (red, green, blue and amber), instead of the wedge being one solid color, which is the usual arrangement.
 This photo is blurry, but you can see how the multicolor stripes illuminate the tree with more color than just one as it rotates.
 That's my dog, Cody, unimpressed with the tree, and a bit of a sleepy old man at 14. (He's a Border Collie mix, if you're curious.)
Oh look! A couple of wiseguys! Er, wise men. Here's Balthazar and Caspar - but where's Melchior?
 Ah, there he is! These guys look great on a silver tree don't they? The metallic plastic is just the thing to celebrate Mithras' birthday. Who? Oh him...
 Ah, there he is! These guys look great on a silver tree don't they? The metallic plastic is just the thing to celebrate Mithras' birthday. Who? Oh him...
 Even the rubber tree got a little bling. In the background you can see, a set of "marbleous" ornaments (acrylic paint poured into glass balls, and swirled) and my daughter's very first xmas portrait.
The first year I tried decorating one of these beauties, I quickly learned that they just won't hold the weight of modern resin/plastic ornaments, so most of my Hallmark ornaments stayed in boxes. I began collecting older ornaments, the tacky plastic ones made by Jewelbrite and others, because they're so much lighter, and really add to the je ne sais quoi of an aluminum tree. My real prizes are the pressed aluminum snowflakes - they're fragile and not in great shape, but I love them! In the 3rd pic (from the top) you can see the bright pink and the green one toward the bottom.
Currently, I have silver and red metallic netting under the tree serving as a tree skirt. I have Plans for a new one, but no time to get it sewed between now and the 25th.
Subscribe to:
Posts (Atom)