Back in
February, I posted about my glass and china project. More
recently, I figured out a way to eliminate the scads of jewelry boxes I have and incorporating the sparkle of glass and the delicacy of china to both decorate and organize an awkward space in one of my closets. I can't claim that I came up with the idea on my own, I was inspired by something I saw at
Martha Stewart online.
I suppose I've been putting way too much thought into it, as usual, but I've been trying to find the "just right" piece to go with the orphaned saucers and small plates. I really like my adaptation of using glass pieces with the saucers; it allows the beauty of the china to show (and is sparkly!). I've also been playing with stacking the pieces to make tiers, something I've seen on
Etsy from quite a few sellers. Call it upcycling or repurposing, or whatever crafty buzzword you like, it's easy to do, inexpensive, and personal. If you do it yourself, you get exactly what you want, with pieces you found. I'm calling these sets Orphanware™* because I'm using single pieces from what was once a set (usually), even the glassware in many cases were single pieces. I don't like to take one piece from a pile, in case someone else comes along later, wanting to buy a set of the same pattern, but that's me.
There are probably tons of tutorials on the net for this, but I haven't seen them, so I'm doing my own since I have a bunch I'm about to start gluing anyway.
FIRST, gather your pieces. I don't recommend raiding your stash of family heirlooms, but hit the thrift stores -
Goodwill,
The Salvation Army, and Habitat for Humanity's
ReStore are all excellent places for finding pieces, and you can also check
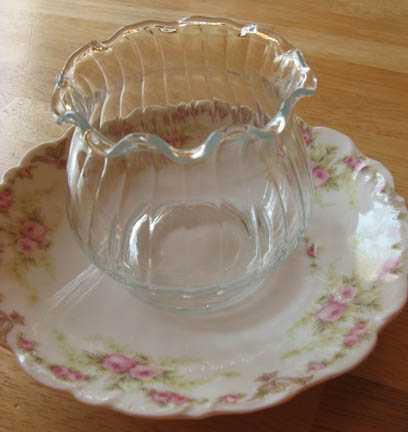
The Thrift Shopper for other stores in your area. The nice thing is, many of these stores are charity organizations and by shopping there you're also doing some good in your neighborhood. Prices can vary widely, but plan on paying 50¢ to $1 for saucers and small plates, maybe $2-3 for glass particularly if it's lead crystal and the people pricing recognize it. If you're buying saucers, try to find glass pieces that fit inside the well for the cup (there may be a correct term for that, but I don't know it). Saucers are nice because you don't have to worry about centering anything like you might on a bread and butter plate. I also tried to find glassware that was compatible with the design on the plate. (Perhaps you're less obsessive than I...)
SECOND, soak 'em. Those price stickers are a pain in the butt. The best way to get them off, without leaving a bunch of glue behind, is to soak them in the sink in hot soapy water. Leave them in long enough and you'll probably find they slip off on their own. After they've soaked and you've gotten all the stickers off, wash your pieces carefully. Some of them may be antique or at least vintage, so scrubbing them isn't a good idea. They will need to be completely dry before you start gluing.
THIRD, assembly. I use
E-6000 adhesive. It's industrial strength (literally) and stinky, but it works great. For some reason, the tube comes with warnings, but not directions, so save the cardboard that the tube was carded on. If you, like I, threw away the card, the link above has all the instructions you need. If you've never used it before, here's a word of caution, squeeze the tube
veeeeerrrrry carefully. It keeps coming out of the metal tube even after you stop squeezing. Once glued, set the pieces aside, out of the way, where you won't be tempted to mess with them. Leave them be for at least 24 hours. If you're making tiered pieces, don't apply your second tier until the adhesive on the first one has cured.
So that's the basic process. Simple, eh? Here's the photos from this latest batch of Orphanware™
 |
| This saucer has light blue flowers, and the candle holder accents that. |
 |
| Because the wire looped around the bottom, I had to use quite a bit of glue to make it enough to adhere to the plate. What's there in the photo wasn't enough - I had to add more. The glue in the center isn't functional, it's to scrape off the excess glue that kept coming out of the tube. |
 |
| When you have something that's larger than the well in your saucer (or no well at all), you have to eyeball it, or get all anal and measure. It helps if there's a design to follow. |
 |
| If what you're gluing is transparent, you can also look down inside to see if you're centered. |
 |
| With no well, it can be tricky to get everything centered. This still needs adjusting. |
 |
| This saucer has a design in the center of the well, and is too pretty to cover. The candlestick is the perfect way to use the dish, raise it up and make a small pedestalled dish. |
 |
| The easiest way to do that, including making tiers, is to flip it over. Much easier to get it centered that way. |
 |
| An example of both a well-fitting piece inside the saucer well, and the glassware complementing the china. |
 |
| A saucer, a very small brass vase, and a butter plate, soon to be a tiered set. |
 |
| I like to rotate the piece I'm gluing, to try and distribute the adhesive evenly. This will probably put glue where you don't want it, but once cured, the adhesive can be scraped away. |
 |
| I did what I suggested you NOT do: I didn't wait for the first two pieces to cure before adding the third. (I'm impatient. Don't be me. Really.) |
 |
| One reason not to be me, it's much harder to get things centered when you're craning your neck to see the bottom. Also, that brass vase wasn't completely level on top. I had to position the butter plate where I wanted it, tipping slightly forward. (Tipping to the side accents the fact that it's not a perfect vertical line.) |
 |
| One of the hazards of gluing clear glass on an edge - you're bound to make a bit of a mess with the glue, smearing it inside, where you won't be able to scrape it off once the top piece is glued on. |
 |
| One more example of pieces fitting well. The top of that candlestick fit perfectly into the bottom of the bowl. Also, the finish of both is a warm white, almost a bone color. Together, it nearly looks like they were always that way. |
Other than jewelry or makeup organizers, what else can you do with these? Candy dishes, desk organizers, saucers on pedestals make cute individual cupcake plates... you could even take one plate/bowl combo and put some Easter grass in it with a decorated egg and make individual place settings for Easter brunch. My mom uses the one I have her to organize sweetener packets, and it's way cuter than the things sold for that purpose. This is so very easy to do, and the cost is so small, there's no reason for you not to play with this idea on your own.
* Yes, I am being facetious with the ™ on Orphanware. Because I can. Because it's silly.