Monday, May 21, 2012

What Is Old Can Be New Again

When I was in high school, a summer vacation trip to see family in Mississippi usually also meant a shopping trip for school clothes. One year I got a tie-dyed t-shirt and matching leggings. The leggings were ok, but the t-shirt... oversized with really bright, rich colors, a saturated rainbow with black on white cotton. In spite of many washings, the colors have stayed bright, though the black isn't as dense as it once was. That t-shirt went to college with me, it moved to Chicago with me when I got married, it moved to the 'burbs when my baby was born, and moved again when we needed to find bigger digs. That t-shirt is older than my daughter, older than my marriage! The collar was stretched and fraying, there was a small hole in the front that my previous dog put in it with a toenail, and the seams in the underarms were giving way. Its condition wasn't good enough for donation to charity, but I had seen a way to recycle t-shirts that I wanted to try. Today, I cut up my beloved t-shirt, using a tutorial I found at Polka Dot Pineapple.

Top left, cut and stretched "yarn;" top right, cut but unstretched t-shirt;
bottom, the rolled up skein.
I also saved the sleeves and the shoulders. The pieces are too small to make yarn from, but too big to toss. I have an idea for some of it, but that will only use a small rectangle. It won't be wasted.

My plan is to make a necklace with it, something along these lines but in reverse (multicolored necklace with white embellishments), and not as full; more like this:


I think I want plastic or wood for the beads. It needs to be lightweight, and glass beads would be too heavy. Too, the holes are going to need to be sizable, and I'm more likely to find what I need in wood or plastic. I'll need to browse to see, and if I can't find what I want, I'll just make my own! I might make a bracelet to match, and earrings? Hmm..

Sunday, May 20, 2012

June

It's almost June, which means it's almost time again for 30 Days of Creativity. I'm not sure I want to commit to it this year. On the one hand, it may be exactly what I need. I've been feeling a little stagnant and stale, and by forcing myself to create every single day, it could force me out of that rut. On the other, meh.

It was very discouraging when the shop where I had my art closed after 14 months in business, and a little depressing for me that my work didn't sell any better than it did. I told myself I'd take a month or so at the beginning of the year to refocus. A month or two has become five. I have a new computer, updated software, and no excuse not to get my website updated. Except now I'm fighting inertia, too.

...I think what I really need is for a friend of mine to kick my @$$... *sigh*

Monday, May 14, 2012

This Old Lamp

Went to Goodwill today, looking for stuff to make more garden art for a sculpture garden I'm putting together, and for the things I needed to build a birdbath. I wasn't able to find a base that was substantial enough in the vases or housewares, so I cruised back to the lamps and found this one.

Already removed the hardware and electrical stuff, but trust me, it's a lamp.
Now this thing is completely not my style, but as the base of a birdbath in a flowerbed, I think it will work just fine. (If I hate it, I can always face the painted side toward the street.) I also bought a vase that I'd intended to fit on the top, opening down to fit around the part that's sticking up on top of the lamp, but it's not wide enough in diameter to fit well. Too small by about a half-inch. *sigh* Will have to look some more for the right piece.

Anyway, as I'm looking at this thing with the hole in the center for the electrical stuff, I'm thinking -- Hey, this could make a fountain, one of the bubbler kinds that just spills over the top. It would still need to sit in water, of course, and the small hole that the cord went through is probably insufficient for a good intake, so the bottom would need to be raised up, maybe on some of those little flat glass "stones," but it could work. However, this does not change the issue of "not my style." I could paint it, of course, but it would need to be sanded first, and then I'd have no base for my birdbath.

However... I have to go find a wide-mouthed vase anyway... and I might as well look at the lamps while I'm there. Right??


Saturday, April 28, 2012

Old Things Made New

I have skirts I love, but never wear because they're too long. Two things can happen: I can stuff them back in the closet and ignore them, or I can alter them so they suit better. (Or I could donate them.) Since I've already altered some of my other too-long skirts, this was a no-brainer.
 
PROJECT ONE

Ankle-length skirts on someone who is already short just makes a person look like they're standing in a hole. I don't want to look like I'm standing in hole.


There are three side seams in this skirt. The two in front I'm going to pull up the skirt about an inch above where the black starts and sew it in place. I have some velvet ribbon I'm going to sew over the seams to emphasize and make it look like the button I'm adding is functional and not merely decorative. I suppose I could stop there, and leave the back alone, but it's really quite long, and I don't want that much of a length difference between front and back...
 

...so I'll pull it up too, wrapping it over the waistband and stitching it in place. I also have a pretty black lace I'm going to sew onto the hem before I start all this. It's sort of steampunk-inspired; Steampunk Light, maybe.

PROJECT TWO

Same skirt, different colors. But for this one, I want to try something different. I'm going to open up those three seams about halfway, and stitch the corner of one "panel" to the next seam, then the next panel to the next seam, all the way around.  I have no idea how that's going to work...


...but it probably won't look anything at all like that. In the above photo, I haven't ripped open any seams yet, so who knows how it's going to look. If I don't like it, I can try something else!

PROJECT THREE

I love the colors in this skirt, but it's soooo long! I don't want to cut it off and lose any of the color or sequins, so...


...I'm going to turn it into a dress. It needs a wider belt (white?) and I think I'm going to try and make a shrug for it, too. The straps will be made from the tie that was in the waistband.

PROJECT FOUR

Cute dress, eh? Goodwill find, and it fits nicely... except it's too long. Gonna hem that baby to knee length, and maybe (maybe), I'll open the side seams a little for a sexy little glimpse of thigh.

PROJECT FIVE A, B, C

This is a tan polyester lace t-shirt, lined with more polyester. I'm going to rip out the lining and turn the lace into a shrug. It may or may not work well with the black and tan skirt. We'll see.


I got two more tees that I thought might work well as shrugs, but maybe not, after all. The tutorial for the shrugs (link above) says to remove the neckband, which is one of the things I like about black tee #1. Nothing fancy, just a small braid of the knit, but I don't want to remove it altogether. I'm going to see if I can find a way to keep it.


With black tee #2, not only does it have a neckband that I like, but it also has a tied keyhole back. Again, not sure how to make it work, but I'm going to give it a go.

PROJECT SIX

And here's the part where I've pretty much gone a little crazy. The only thing of the four items above that fits reasonably well is the cotton plaid capris, and they're a little big. The solid green capris (left) are a linen/rayon blend, as is the striped skirt. The paisley skirt (right) is polyester. The two skirts on the right are new, tags still in them, and much (much!) too big. I bought them basically for the fabric. In fact, all four of those pieces were basically because I loved the colors. I have in my head a dress or a skirt or an outfit... made from all those things. And no idea how I'm going to do it! :D All I know is, if I had not bought those two skirts, I'd have regretted it for a long time. I don't know what it is about them, the soft mossy green, mocha and beige just really grabbed me, and I love the idea of using a stripe with the paisley, and the plaid with both.

Since I have no idea how I'm going to pull those things together, I'll sit on that for a while, until I know exactly what I want to do. Just the two skirts would be fun as a spiral, like this (version #2). Not as colorful with only two fabrics, since I don't think I could get the pattern piece onto the pants (each gore needs a 25" x 23" piece of fabric), without piecing them or having a seam in the middle of the gore, but we'll see. Maybe it will work... or maybe I don't want it to. The different fabric weights, sturdy-to-filmy, might make for a bizarre skirt. Or it might be amazing! 

At any rate, I have more than enough to keep me busy and out of trouble while I wait for the weather to improve long enough to bring home the plywood for my closet overhaul.

Friday, March 16, 2012

Orphanware™ - The Tutorial

Back in February, I posted about my glass and china project. More recently, I figured out a way to eliminate the scads of jewelry boxes I have and incorporating the sparkle of glass and the delicacy of china to both decorate and organize an awkward space in one of my closets. I can't claim that I came up with the idea on my own, I was inspired by something I saw at Martha Stewart online.

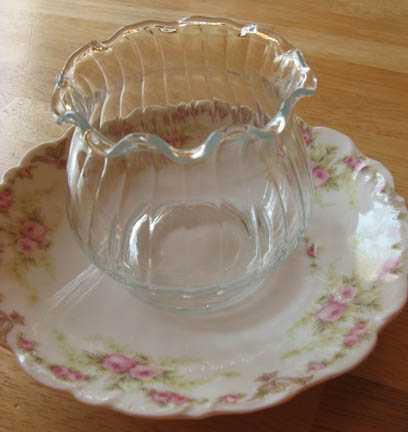
I suppose I've been putting way too much thought into it, as usual, but I've been trying to find the "just right" piece to go with the orphaned saucers and small plates. I really like my adaptation of using glass pieces with the saucers; it allows the beauty of the china to show (and is sparkly!). I've also been playing with stacking the pieces to make tiers, something I've seen on Etsy from quite a few sellers. Call it upcycling or repurposing, or whatever crafty buzzword you like, it's easy to do, inexpensive, and personal. If you do it yourself, you get exactly what you want, with pieces you found. I'm calling these sets Orphanware™* because I'm using single pieces from what was once a set (usually), even the glassware in many cases were single pieces. I don't like to take one piece from a pile, in case someone else comes along later, wanting to buy a set of the same pattern, but that's me.

There are probably tons of tutorials on the net for this, but I haven't seen them, so I'm doing my own since I have a bunch I'm about to start gluing anyway.

FIRST, gather your pieces. I don't recommend raiding your stash of family heirlooms, but hit the thrift stores - Goodwill, The Salvation Army, and Habitat for Humanity's ReStore are all excellent places for finding pieces, and you can also check The Thrift Shopper for other stores in your area. The nice thing is, many of these stores are charity organizations and by shopping there you're also doing some good in your neighborhood. Prices can vary widely, but plan on paying 50¢ to $1 for saucers and small plates, maybe $2-3 for glass particularly if it's lead crystal and the people pricing recognize it. If you're buying saucers, try to find glass pieces that fit inside the well for the cup (there may be a correct term for that, but I don't know it). Saucers are nice because you don't have to worry about centering anything like you might on a bread and butter plate. I also tried to find glassware that was compatible with the design on the plate. (Perhaps you're less obsessive than I...)

SECOND, soak 'em. Those price stickers are a pain in the butt. The best way to get them off, without leaving a bunch of glue behind, is to soak them in the sink in hot soapy water. Leave them in long enough and you'll probably find they slip off on their own. After they've soaked and you've gotten all the stickers off, wash your pieces carefully. Some of them may be antique or at least vintage, so scrubbing them isn't a good idea. They will need to be completely dry before you start gluing.

THIRD, assembly. I use E-6000 adhesive. It's industrial strength (literally) and stinky, but it works great. For some reason, the tube comes with warnings, but not directions, so save the cardboard that the tube was carded on. If you, like I, threw away the card, the link above has all the instructions you need. If you've never used it before, here's a word of caution, squeeze the tube veeeeerrrrry carefully. It keeps coming out of the metal tube even after you stop squeezing. Once glued, set the pieces aside, out of the way, where you won't be tempted to mess with them. Leave them be for at least 24 hours. If you're making tiered pieces, don't apply your second tier until the adhesive on the first one has cured.

So that's the basic process. Simple, eh? Here's the photos from this latest batch of Orphanware™

This saucer has light blue flowers, and the candle holder accents that.

Because the wire looped around the bottom, I had to use quite a bit of glue to make it enough to adhere to the plate. What's there in the photo wasn't enough - I had to add more. The glue in the center isn't functional, it's to scrape off the excess glue that kept coming out of the tube.

When you have something that's larger than the well in your saucer (or no well at all), you have to eyeball it, or get all anal and measure. It helps if there's a design to follow.

If what you're gluing is transparent, you can also look down inside to see if you're centered.

With no well, it can be tricky to get everything centered. This still needs adjusting.

This saucer has a design in the center of the well, and is too pretty to cover. The candlestick is the perfect way to use the dish, raise it up and make a small pedestalled dish.

The easiest way to do that, including making tiers, is to flip it over. Much easier to get it centered that way.

An example of both a well-fitting piece inside the saucer well, and the glassware complementing the china.

A saucer, a very small brass vase, and a butter plate, soon to be a tiered set.

I like to rotate the piece I'm gluing, to try and distribute the adhesive evenly. This will probably put glue where you don't want it, but once cured, the adhesive can be scraped away.

I did what I suggested you NOT do: I didn't wait for the first two pieces to cure before adding the third. (I'm impatient. Don't be me. Really.)

One reason not to be me, it's much harder to get things centered when you're craning your neck to see the bottom. Also, that brass vase wasn't completely level on top. I had to position the butter plate where I wanted it, tipping slightly forward. (Tipping to the side accents the fact that it's not a perfect vertical line.)

One of the hazards of gluing clear glass on an edge - you're bound to make a bit of a mess with the glue, smearing it inside, where you won't be able to scrape it off once the top piece is glued on.

One more example of pieces fitting well. The top of that candlestick fit perfectly into the bottom of the bowl. Also, the finish of both is a warm white, almost a bone color. Together, it nearly looks like they were always that way.

Other than jewelry or makeup organizers, what else can you do with these? Candy dishes, desk organizers, saucers on pedestals make cute individual cupcake plates... you could even take one plate/bowl combo and put some Easter grass in it with a decorated egg and make individual place settings for Easter brunch. My mom uses the one I have her to organize sweetener packets, and it's way cuter than the things sold for that purpose. This is so very easy to do, and the cost is so small, there's no reason for you not to play with this idea on your own.

* Yes, I am being facetious with the ™ on Orphanware. Because I can. Because it's silly.

Wednesday, March 14, 2012

Closet Woes, Continued

I got the memo board put up. I used clear pushpins and glued rhinestone stickers (I didn't want to trust the adhesive) with E-6000 glue to the tops so they were more decorative and had a larger head to keep things from slipping off. I did way more pushpins than I needed -- it's a small memo board, after all, but I figured I might as well.

The original memo board had 4 hooks (though one was missing) and I couldn't find the exact right kind of hook to match, or even ones that were the right size at the hardware store. I did find what I thought would work at D. Lawless Hardware, and they worked great! I even added 5 more hooks, staggering them in a row above the original 4 to accommodate 9 necklaces.

I did hit a bit of a snag, though. Many of my necklaces are on longish chains, so there's not as much room at the bottom for bracelets as I'd hoped. I also discovered that my jewelry boxes contain a number of broken chains, one's I'd kept with the thought I'd repair them one day. (If I haven't by now, it seems unlikely I will.) So perhaps I'll replace them with shorter ones...


The other issue with the length is that the ones hanging below take up considerably more room than I'd budgeted for, for the shelves I want to put in below. I may go ahead and put in the shelves as planned, and put the longer necklaces elsewhere; I have a lot of organizing to do! But this was a good start, and I'm pleased with the results.

The coloring of the memo board (purple, pink and yellow-green) matches the colors in the bedroom. When you open the closet doors, when I'm all finished with my closet reno, it will look like a part of the room and not just something that go thrown up on the wall randomly.

Wednesday, March 7, 2012

Inexpensive Library Table

When we bought our house, we were excited about the formal living room. Not because we're formal people, but because the space was perfect for a home library. We're both bibliophiles, and have a ton of bookcases. We bought more...

Because the room was sizable, we decided to make a library table using six short bookcases (two rows of three set back-to-back) with a furniture-grade plywood top, and trimmed out to look like a single, sizable, piece of furniture. The whole thing sits on a rug that protects the hardwood floor and breaks up all the woodgrain, floor to (laminate) bookcases. We bought the bookcases (furniture-in-a-box; I think the manufacturer is Sauder) on sale at Meijer as part of their back to school sale, so if you're thinking of trying this, that's a good time to buy them. 

The top of the table is made from a sheet of plywood, cut to size and stacked. A single layer didn't give us the height we needed to add trim and have the trim be high enough to get books off the top shelf.
We used that grippy shelf/drawer liner stuff to keep the plywood from sliding on the tops of the bookcases. I used green wood stain on the plywood, a color close to one of the shades of green in the rug. (The room also has one green wall.)


Two coats of Minwax Express Color in Emerald, much prettier in person.
Once the top was finished, the trim was stained. I used Minwax PolyShades hoping to do it all in one shot -- don't be lazy; I hate that crap and won't ever use it again. Use stain, then seal it with polyurethane. PolyShades is nearly impossible to apply evenly. ANYway, we found trim that had a leaf motif, an excellent complement to both the green colors in the room, and the leaves in the rug. The trim was mitred to fit perfectly onto the table surface, and nailed into the plywood. (If we had to, the table surface can be lifted off of the bookcases, but it would take several people to do it -- it's heavy!)

First coat of poly/stain. We found the trim at Home Depot.
The finished table, exactly the right height for looking something up in the big unabridged dictionary, is my pride and joy. It's the first thing I see when I come downstairs in the morning, and it still gives me a bit of a rush.


Completed table, with the trim stained to closely match the color of the laminate bookcases.
I call it an "inexpensive library table" only in comparison to something that was made in a single piece and out of wood instead of particle board. I honestly don't remember exactly what we paid for each one, but it was probably around $20 each on sale (this was two years ago), so "inexpensive" is highly relative. If you're thinking of picking them up one at a time, as finances allow, remember that availability may change, styles may be discontinued, etc. 


Also, if you're a serious bibliophile and need to keep track of your collection, I highly recommend LibraryThing, an online book cataloging website. It's fantastic!