I signed up at Pinterest in June as part of 30 Days of Creativity, but didn't really do much with it after the month was done. A friend of mine started using it, which made me take a second look at the site. And I have been using it to daydream about new projects ever since...
Ever since I got over my initial horror of destroying books, working on my own altered book, I've been looking at them with new eyes. So many books are discarded! I would never destroy something valuable (collectible, rare, etc.), but there's an awful lot of books that don't fall into that category. If you just look at the people who've tagged recycled books on Pinterest, there's tons of amazing, creative and fun projects. There's Christmas ornaments in particular I am dying to make. Currently, my vintage aluminum tree is set up in the library... but wouldn't it be awesome to have a book-themed tree?
We're working on finishing up our unpacking and organizing (we moved in last July) in the basement, where a lot of boxes ended up, yet to be unpacked. I know how I want to decorate that space, and Pinterest is giving me a lot of inspiration there, too.
Whatever you can think of, there's probably someone at Pinterest who's thought of it, too. And you will find a million ways to procrastinate.

Friday, December 9, 2011


Saturday, December 3, 2011
Hydrangea Topiary

Cut all the florets off the flowers and press the stems into the ball. I used a toothpick to make a "pilot hole". Start at the top and work your way down, spacing them so that they're bunched together and look full. Leave space at the bottom to insert the dowel. If you have any florets left over, carefully look at your ball and see if there are any places that look spare, and fill in. You can also rearrange the orientation of the 4-petaled florets to cover any thin places.
I happened to have a 14-inch piece of 1/4" dowel on hand, so that's what I used. Paint the dowel (I used a mossy green), let dry, and carefully insert into the ball, being careful to keep it vertical. If you don't, it will go in crooked and your topiary will look lopsided.
Paint your pot, if desired, and let dry. Trim a piece of florist foam (I had some on hand; you could also use styrofoam) so that it fits into the pot very snugly. Mark the center of the foam and insert the dowel - again being careful to keep it vertical.
Attach dried moss to the top of the foam with hot glue. Gather several loops of ribbon with a small piece of wire and twist the wire to hold the ribbon loops in place. Wrap the wire ends tightly around your toothpick and insert the pick into the base of your foam ball, near the dowel. Done!
The eggplant and mulberry colors in my topiary are inspired from the shower curtain, which has dusty mauve, plum and moss, on an off-white background. You don't have to use hydrangeas, of course, small rosebuds work for this beautifully, but you need a ton of them. The most tedious and time-consuming part is putting the flowers in the styrofoam. I think I spent over an hour doing it - on a 4-inch ball! (Finished ball is about 6 inches across.)
Sunday, November 27, 2011
Bah! Humbug!
I have a confession: I am beginning to loathe Christmas. I worked for several years in retail until I had my daughter, and even worked on and off part time after that. I have enough retail holidays under my belt to make anyone hate this season. The only things that keep me from chucking it all are #1: My daughter - she's 14, autistic, loves getting presents and going shopping. #2: I like Christmas decorations, I just really hate seeing them before Hallowe'en! #3: I like making them.
I suppose what I really have issue with are the mad, materialistic crowds of people, the fact that the holiday is encroaching steadily on my favorite holiday (Hallowe'en), and the expense of it all! I can understand that some holiday things need to be available before Thanksgiving; if you're making a Christmas quilt (etc.), you have to have the themed fabric well in advance. But the ceramic villages, the ornaments, and the candy for cripes' sake! does all that need to be out on the sales floor before the jack o'lanterns get moldy? (Here's a hint: NO!!!)
If I could manage to stay in my home until January, I think I'd be the happiest camper in the known universe. Alas, I'll have to go to the grocery store, run various errands, do a little gift shopping, whether I want to or not... I just want to be Howard Hughes (without the crazy fingernails or the tissue boxes on my feet) for a smidge over a month - is that too much to ask?
I suppose what I really have issue with are the mad, materialistic crowds of people, the fact that the holiday is encroaching steadily on my favorite holiday (Hallowe'en), and the expense of it all! I can understand that some holiday things need to be available before Thanksgiving; if you're making a Christmas quilt (etc.), you have to have the themed fabric well in advance. But the ceramic villages, the ornaments, and the candy for cripes' sake! does all that need to be out on the sales floor before the jack o'lanterns get moldy? (Here's a hint: NO!!!)
If I could manage to stay in my home until January, I think I'd be the happiest camper in the known universe. Alas, I'll have to go to the grocery store, run various errands, do a little gift shopping, whether I want to or not... I just want to be Howard Hughes (without the crazy fingernails or the tissue boxes on my feet) for a smidge over a month - is that too much to ask?
Monday, November 7, 2011
UFOs
UFOs... the bane of my existence. UnFinished Objects are all over the house. They're in boxes in the basement, in pieces all over everywhere, mocking me. How often do I start something, all gung-ho, only to get bored/disgusted/distracted/stuck with a project? Sometimes it's that I just don't know how I want to finish it. Sometimes I know what I want and can't find some elusive something I think I must have. Other times, I run out of time finishing a seasonal thing, and shelve it for next year (theoretically).
A couple days ago, I picked up an oldish crochet project that I keep meaning to finish. And I need to hurry it up if I'll get to use it this season: it's an openwork poncho sort of thing, and if I don't get it in gear, it'll be next year before I can wear it. The front and back pieces are finished, and I've stitched the shoulders together, but I think I need to make the neck hole smaller, since it's pretty ginormous at the moment. Then comes the fun part: adding the fringe. Miles of different textures and fibers, all in rusty autumn shades (another reason I need to get it finished). I hope I can make what I see in my head come to life in the yarn. There's only one way to find out...
Will post a pic when I get it finished, hopefully in a day or so. (Don't hold me to that!)
A couple days ago, I picked up an oldish crochet project that I keep meaning to finish. And I need to hurry it up if I'll get to use it this season: it's an openwork poncho sort of thing, and if I don't get it in gear, it'll be next year before I can wear it. The front and back pieces are finished, and I've stitched the shoulders together, but I think I need to make the neck hole smaller, since it's pretty ginormous at the moment. Then comes the fun part: adding the fringe. Miles of different textures and fibers, all in rusty autumn shades (another reason I need to get it finished). I hope I can make what I see in my head come to life in the yarn. There's only one way to find out...
Will post a pic when I get it finished, hopefully in a day or so. (Don't hold me to that!)
Friday, October 21, 2011
Who put that graveyard there?
TOMBSTONE TUTORIAL
For the last couple weeks, I've been working on a project. I wanted to make some tombstones for the yard for Hallowe'en, so I watched a bunch of tutorials online, read a bunch more, came up with my plan and executed it.
For durability and weight, I decided to use treated plywood (1 3/8-inch, 4x8-feet panel), glued to the back of styrofoam panel insulation (half-inch, precut 18-inch x 4-feet pieces). I figured I could get a dozen 16x24-inch tombstones out of that. I bought my materials at Menard's and Home Depot, and overall spent around $60.
Once all my plywood was cut into manageable pieces, I sketched on cutlines for fancier tops, which I used a jigsaw to cut.


At my husband's suggestion, I used a belt sander to clean up the edges of the cut pieces, which also made them more comfortable to handle. I then used the cut pieces of plywood as my template for the cutlines on the styrofoam... and that's when I hit my first snag. The styrofoam pieces were not 16-inches wide as I assumed they were, but 14.5-inches - this was MY fault, the package they came in did state that, but that meant 3/4-inch needed to be trimmed from both sides of each plywood pieces. My husband did that in about 5 minutes with his table saw, and I was off and running again. Styrofoam was cut using a snap-blade utility knife.


I had bought 3M's foam adhesive, and used that to spray on both pieces, sticking them together and stacking them on the floor, with heavy buckets on top to keep the pressure on to help with adhering.
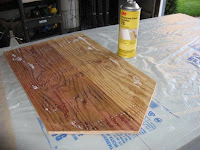

In the morning, I hit my second snag: some of the pieces were NOT sticking together. I think this is probably my fault, but the spray glue did etch into the foam pretty badly, removing some of the surface area for the wood to stick to. I ran and got some Loctite foam glue and used that to reglue the pieces.

From this point, I was ready to get my lettering started. I'd seen an awesome tutorial using extruded foam (the pink or blue stuff, not the beady white stuff I used), an iron and photocopies for toner transfers. I got my epitaphs made, printed them out reversed, made the photocopies and made a test run on scrap.

The styrofoam melted quite a bit, and the paper stuck to the foam pretty badly. I tried using less heat, less pressure, and that resulted in a transfer that was too hard to see. I played with some other ideas, tracing the lettering with a Sharpie (letting the ink bleed through the paper onto the foam), tracing with a pencil (too hard to read), tracing with a woodburning "pen" (lettering blurry on the surface), using a pin to "trace" the letters (OMG, that would have taken me years to finish)... and finally decided to freehand the letters.
I wrote them in pencil on the styrofoam, then traced my pencil marks with a soldering iron (instead of the woodburning tool; the soldering iron had a pointed tip, the woodburner was chiseled, got cleaner lines with the soldering iron). I did this on my screened sunporch with the doors open and the fan on, so I wasn't inhaling melted plastic fumes.
Once I was finished with that, I sprayed into the letters with black spray paint, knowing that it would eat into the foam (making the surface look "rockier"). Alas, I got carried away, and some of my pieces got eaten TOO much, and I still had to go back and do the lettering with thinned acrylic paints...
Once my acrylic lettering was done, I used exterior latex house paint (that we already had on hand) and a roller to apply the grey paint that would (hopefully) look like stone, more or less, AND protect the surface, front and back.
Some of my lettering had to be touched up after the latex paint was done, but it wasn't much work for that, and most of them didn't need any touching up at all.
Now I was ready to "age" them, using green and brown acrylic paint to give the look of moss and lichen growth. This was a pretty random process, and I tried not to overthink it, make it too uniform or symmetrical.

Success! Pleased with my aging process, I let them dry overnight, and then put the brackets on that would hold them to the posts in the ground.
For the last couple weeks, I've been working on a project. I wanted to make some tombstones for the yard for Hallowe'en, so I watched a bunch of tutorials online, read a bunch more, came up with my plan and executed it.
For durability and weight, I decided to use treated plywood (1 3/8-inch, 4x8-feet panel), glued to the back of styrofoam panel insulation (half-inch, precut 18-inch x 4-feet pieces). I figured I could get a dozen 16x24-inch tombstones out of that. I bought my materials at Menard's and Home Depot, and overall spent around $60.
 |
| Cut slabs of plywood |


At my husband's suggestion, I used a belt sander to clean up the edges of the cut pieces, which also made them more comfortable to handle. I then used the cut pieces of plywood as my template for the cutlines on the styrofoam... and that's when I hit my first snag. The styrofoam pieces were not 16-inches wide as I assumed they were, but 14.5-inches - this was MY fault, the package they came in did state that, but that meant 3/4-inch needed to be trimmed from both sides of each plywood pieces. My husband did that in about 5 minutes with his table saw, and I was off and running again. Styrofoam was cut using a snap-blade utility knife.


I had bought 3M's foam adhesive, and used that to spray on both pieces, sticking them together and stacking them on the floor, with heavy buckets on top to keep the pressure on to help with adhering.


In the morning, I hit my second snag: some of the pieces were NOT sticking together. I think this is probably my fault, but the spray glue did etch into the foam pretty badly, removing some of the surface area for the wood to stick to. I ran and got some Loctite foam glue and used that to reglue the pieces.

From this point, I was ready to get my lettering started. I'd seen an awesome tutorial using extruded foam (the pink or blue stuff, not the beady white stuff I used), an iron and photocopies for toner transfers. I got my epitaphs made, printed them out reversed, made the photocopies and made a test run on scrap.

The styrofoam melted quite a bit, and the paper stuck to the foam pretty badly. I tried using less heat, less pressure, and that resulted in a transfer that was too hard to see. I played with some other ideas, tracing the lettering with a Sharpie (letting the ink bleed through the paper onto the foam), tracing with a pencil (too hard to read), tracing with a woodburning "pen" (lettering blurry on the surface), using a pin to "trace" the letters (OMG, that would have taken me years to finish)... and finally decided to freehand the letters.
|
| Heat transfer, melted styrofoam |
 |
| Sharpie through paper, partially re-traced; pin-hole transfer, traced with pen |
 |
| freehanding |
Once I was finished with that, I sprayed into the letters with black spray paint, knowing that it would eat into the foam (making the surface look "rockier"). Alas, I got carried away, and some of my pieces got eaten TOO much, and I still had to go back and do the lettering with thinned acrylic paints...
 |
| bottom: painted lettering using thinned acrylic (craft-grade) paints; top is not yet painted |
 |
| here's one of the ones that got eaten by the spray paint pretty badly, even once I added the black acrylic to bring out the lettering, some were just too damaged to be legible |
Once my acrylic lettering was done, I used exterior latex house paint (that we already had on hand) and a roller to apply the grey paint that would (hopefully) look like stone, more or less, AND protect the surface, front and back.
 |
| before house paint |
 |
| after house paint |
Now I was ready to "age" them, using green and brown acrylic paint to give the look of moss and lichen growth. This was a pretty random process, and I tried not to overthink it, make it too uniform or symmetrical.

Success! Pleased with my aging process, I let them dry overnight, and then put the brackets on that would hold them to the posts in the ground.
 |
| brackets are made from steel hanger strap, cut with tin snips and bent by hand (using the post as a guide) |
 |
| the post was used to help me align the brackets; everything was eyeballed, I didn't measure anything here |
With my brackets in place, I was ready to turn my front yard into a cemetery!
 |
| before |
 |
| after! |
THINGS I LEARNED:
1. Never assume anything. I assumed the foam sheets were 16" wide, because the package said it covered an area 4x8 feet - the same as my plywood. Smaller print said that the pieces were actually 14.5" wide. This was annoying, but trimming the plywood fixed it.
2. Anything in an aerosol can is going to eat styrofoam. Even glue intended for that purpose. The Loctite glue (applied with a caulking gun) took longer to use, but didn't eat into my styrofoam.
3. Simpler may be better. I would have gotten really awesome lettering, with lots of different fonts, had the heat transfer technique worked. In the end, freehanding worked better for me, and I just used my printed sheets as a kind of guide for the lettering I drew on. Fancy lettering would have taken a lot longer to trace with the soldering iron, too, and longer to paint later.
4. DRAG the soldering iron, don't PULL it through the styrofoam. Pulling it was too fast, and it tended to snag in the little balls in the styrofoam, pulling my lines crooked. Dragging it was slower, and my lines were straighter. Also, make sure those lines are deep!
5. Spray paint simply did not do what I wanted it to do. I ended up repainting all the lettering anyway, so I could have skipped that entirely, or maybe do a LIGHT surface spray, just to roughen up the smooth flat front a little bit. (This is probably operator error as much as anything.)
6. It's going to take longer than you think. For some lunatic reason, I though I could get all 12 tombstones made in a week's time, max: the weekend to cut and glue, and maybe a couple days to paint and done. Maybe if I didn't also have a family to care for, I could have... but even if it was just me, and I didn't eat, I don't think I could have gotten this done in 5 days.
I hope this has been informative. There are so many tutorials online for these, so many really talented people... they inspired me to try this but put my own spin on it. I think my decision to marry plywood and styrofoam was a good one; I have some weight so they won't blow away or be easily damaged, and the soldering iron carved my letters into the foam beautifully. All in all, this was a great project. I learned a lot, and even with some bumps along the way, they turned out great. I'm really pleased with them.
Saturday, October 1, 2011
Halloweenie
This morning I put up the Halloween decorations that I have. Honestly, there weren't that many, because up until now, we haven't had the space to store a bunch of decorations and still don't have the money to splurge. But that's not all bad, because making them is fun, and I need something to keep my restless hands busy.
I've been toying with the idea of using vintage diecut jack o'lanterns as patterns for making with felt in layers, using three or four layers as needed for the different colors. That's a little ambitious, so I thought I'd start a little smaller, and use craft foam sheets and do a simplified version of that same idea. I even found a prepackaged bunch of yellow and orange pumpkin shapes (some with glitter!) that I'll layer, yellow behind the orange, creating a similar effect.
At the same time I bought those, I also got some plain orange precut pumpkins, a yellow sheet, black and white, two shades of green, and a medium blue sheet. These are for my daughter, whom I am hoping to engage in some creativity and let her make the faces from shapes I'll cut out. [Note: My daughter is 14 and autistic, and lately if it's not a video on the PBS Kids website or Heidi Kenney's Yummy stuff, she can't be bothered. However, she enjoys Halloween, so I'm hoping to get her involved with me on this. Not holding my breath, mind you...]
This time of year also allows me to drag out my guilty pleasure collection of Halloween Barbie dolls. I love them. Some are better than others, of course, but I love them all. Then I see some of the one of a kind originals some clever artist has made, and is selling for fabulous amounts, and I think I have a sewing machine, I can do repaints like those artists, and I could make my own visions... I know, I'm crazy. My sewing skills are rudimentary at best. But I can learn, right??
I enjoy making dolls. Weird dolls, dolls with strange materials, teeny dolls, mixed media dolls... and this time of year, I lean toward making witchy dolls. I'm dying to try an apple head doll. I wrote a children's alphabet book for the season, and I want to make all the dolls for illustrations. SO BAD! I think the worst part is having all the ideas, and no idea where to start.
I've been toying with the idea of using vintage diecut jack o'lanterns as patterns for making with felt in layers, using three or four layers as needed for the different colors. That's a little ambitious, so I thought I'd start a little smaller, and use craft foam sheets and do a simplified version of that same idea. I even found a prepackaged bunch of yellow and orange pumpkin shapes (some with glitter!) that I'll layer, yellow behind the orange, creating a similar effect.
 |
| Top row, my "patterns" from vintage diecuts; bottom row, my two-layer creations with craft foam. (Yes the right one is backwards. It's still cute.) |
 |
| This is the original, the inspiration for the left pumpkin above. I am still debating whether or not to add the little white teeth to the foam version. |
 | ||
| Pumpkins with the stems added (by me) in the shades of green. |
 |
| I also have leaves for them all, but haven't cut them out yet. |
I enjoy making dolls. Weird dolls, dolls with strange materials, teeny dolls, mixed media dolls... and this time of year, I lean toward making witchy dolls. I'm dying to try an apple head doll. I wrote a children's alphabet book for the season, and I want to make all the dolls for illustrations. SO BAD! I think the worst part is having all the ideas, and no idea where to start.
Friday, September 9, 2011
Really long comments on someone else's blog post...
This started out being comments on Comic Book Grrl's blog post "When it comes to art, is it possible to cheat?" But a) her post was way back in April, and b) I didn't want to hijack her blog with a really long comment (that may or may not ramble a bit).
As a writer, photographer and artist, married to an intellectual property attorney, I have pretty strong opinions on "cheating" in art. Whether you're working in visual media or written word, you've been influenced by others. Some other writer/photographer/etc. has appealed to you, made a difference to you, and even if you don't copy their work directly, their influence has stamped something on your own creativity.
But is there intent? Is the the person intending to pass off someone else's work as their? Are they consciously defrauding their audience? This doesn't take into account the thousands of people who ripped something off the internet, changed it slightly, believing the incorrect idea that if they change a 10% of a work it becomes theirs. That's not fair use, that's copyright infringement, period. A romance author, Cassie Edwards, was called out not too long ago for having ripped off someone's research in her novels (as well as other plagiarized sources). She claimed that she didn't know she was supposed to cite sources. I call bullshit on that. And even if she didn't know (yeah, right...), ignorance of the law is no excuse. When you take an entire paragraph from someone else and slap it into your book (or paper, you Wikipedia-plagiarizing delinquents), you're stealing. When you take someone's photograph, trace it, and pass off the new art as your own, you're stealing. (For instance, Fairey's iconic Obama "Hope" poster was lifted from an AP photo.)
Plato wrote things claiming they were Socrates' words. He may have been trying to legitimize his own ideas claiming they were his teacher's, since Socrates already had standing in the ancient World of Nerds. Similarly, writers who put Shakespeare's name on their plays might have been capitalizing on an established playwright's success. So are the suspected works plagiarized by the Bard, were other writers "borrowing" his name, or were they "ghostwritten"? Difficult to prove and know for certain, since all the actors in that particular play are long dead.
We are all influenced by the world around us, those of us who are artists (in whatever medium) probably more so because we're imaginative and we pay attention. There can be a pretty fine line between inspiration and theft, and intent doesn't even have to play a role. (Intent comes in at the "damages" part of the lawsuit, I believe, and can be hard to prove especially when you're dealing with someone who's already been dishonest about "their" work.) But here's some crazy thoughts: don't steal! don't pass off work someone else did as your own! if you're inspired by someone, claim it! For example:
There is some resemblance to "Dead Tree" by Adams, taken 60 years before I shot my own dead tree. However, I had not seen the Adams photograph at the time I took mine. Can I prove that I didn't see it before? No, you can't prove a negative (a little bit of a non sequitur, but it's funny). However, the works of Ansel Adams are in inspiration for me. I'm reasonably sure his estate is going to show up with their lawyers and beat me with sticks. Reasonably.
So to answer Comic Book Grrl's question "is it possible to 'cheat' [in art]"? Absolutely! It's cheating whenever you borrow someone else's creativity and claim it as your own. And using "inspired by" or "derivative" or "parody" is not always going to CYA (see this article about derivative works).
Go forth and exercise your own voice, express your own creativity, share your vision with the world. If you're inspired by those who have come before, recognize them in your artist's statement, in the acknowledgements in your book, in your official bio/liner notes/website. But don't cheat, don't steal -- you'd be mighty pissed if someone did it to you.
As a writer, photographer and artist, married to an intellectual property attorney, I have pretty strong opinions on "cheating" in art. Whether you're working in visual media or written word, you've been influenced by others. Some other writer/photographer/etc. has appealed to you, made a difference to you, and even if you don't copy their work directly, their influence has stamped something on your own creativity.
But is there intent? Is the the person intending to pass off someone else's work as their? Are they consciously defrauding their audience? This doesn't take into account the thousands of people who ripped something off the internet, changed it slightly, believing the incorrect idea that if they change a 10% of a work it becomes theirs. That's not fair use, that's copyright infringement, period. A romance author, Cassie Edwards, was called out not too long ago for having ripped off someone's research in her novels (as well as other plagiarized sources). She claimed that she didn't know she was supposed to cite sources. I call bullshit on that. And even if she didn't know (yeah, right...), ignorance of the law is no excuse. When you take an entire paragraph from someone else and slap it into your book (or paper, you Wikipedia-plagiarizing delinquents), you're stealing. When you take someone's photograph, trace it, and pass off the new art as your own, you're stealing. (For instance, Fairey's iconic Obama "Hope" poster was lifted from an AP photo.)
Plato wrote things claiming they were Socrates' words. He may have been trying to legitimize his own ideas claiming they were his teacher's, since Socrates already had standing in the ancient World of Nerds. Similarly, writers who put Shakespeare's name on their plays might have been capitalizing on an established playwright's success. So are the suspected works plagiarized by the Bard, were other writers "borrowing" his name, or were they "ghostwritten"? Difficult to prove and know for certain, since all the actors in that particular play are long dead.
We are all influenced by the world around us, those of us who are artists (in whatever medium) probably more so because we're imaginative and we pay attention. There can be a pretty fine line between inspiration and theft, and intent doesn't even have to play a role. (Intent comes in at the "damages" part of the lawsuit, I believe, and can be hard to prove especially when you're dealing with someone who's already been dishonest about "their" work.) But here's some crazy thoughts: don't steal! don't pass off work someone else did as your own! if you're inspired by someone, claim it! For example:
 |
| "Clawing the Sky" ©2007 Wendy A. B. Whipple, inspired by the works of Ansel Adams |
So to answer Comic Book Grrl's question "is it possible to 'cheat' [in art]"? Absolutely! It's cheating whenever you borrow someone else's creativity and claim it as your own. And using "inspired by" or "derivative" or "parody" is not always going to CYA (see this article about derivative works).
Go forth and exercise your own voice, express your own creativity, share your vision with the world. If you're inspired by those who have come before, recognize them in your artist's statement, in the acknowledgements in your book, in your official bio/liner notes/website. But don't cheat, don't steal -- you'd be mighty pissed if someone did it to you.
Subscribe to:
Posts (Atom)