Saturday, February 16, 2013

Shoe-Inspired Jeans

I have been lusting after a pair of shoes for months. I had a coupon, and it was available to use today, finally.

[Cue angel choir]
Rock & Candy "Jackrabbit" in black
They come with cotton lace shoelaces... which are adorable... and fragile... so I replaced them. 

Woven laces tutorial here: http://www.fieggen.com/shoelace/angledcheckerlacing.htm
I've been wanting to do a pair of embellished jeans for a while, and this pair of shoes has inspired me. After I bought my shoes (and the new shoelaces), I headed to the nearest Goodwill. There I found a pair of black jeans that fit well and were in good condition, and also found a floral print knit shirt that has a pattern than nearly matches the floral pattern on the shoes. From there, I went to Joann's, and bought some fabric spray paint, dimensional paint, heat-set rhinestones, paisley-print felt, ribbon roses and lace trims. After I got home, I laced up the shoes (tricky, but it sure looks nifty), then went down to my stash of fabric to gather anything purple that looked like it might work. I also grabbed a couple of sequin appliqués that I really want to use somewhere. Gathered all together, this is what I have:


Now I'm not sure how I'm going to use all of that stuff, IF I will use it all, but this way I can play with the pieces together and see how they might work. I'm kind of kicking around the idea of making my own paisley appliqués. One thing I know I want to do is to lay the jeans flat and cover them with an old lace curtain, then use the spray paint to paint through the lace. I thought I'd freehand paisleys with the metallic black paint writer... but now I'm not sure I want to do something so simple. If I make my own appliqués, I can sew them on the machine, maybe do some embroidery and beading.

Brainstorming on paper: The sketch on the left shows the side seam of the leg opened up and a
lace insert added, with the sequin appliqué at the top of the split.
So many options!

In addition to the jeans, I want to make a Metropolitan Hat (from Folkwear patterns) to match. It's a very similar style to a velvet hat I had years ago that I loved, then donated to Goodwill because I never wore it. The Folkwear hat has a wider brim than the one I had, but that's an easy thing to alter.


And maybe if this goes well, I can make another pair of jeans to go with these...
"Jackrabbit" in mint green (looks aqua to me)

Thursday, February 14, 2013

February's Hat(s): Valentines


This is not a tutorial, mainly because I forgot to take photos of my process. However, I will describe what I did. If you want to try it, hopefully that will give you enough to get you started.

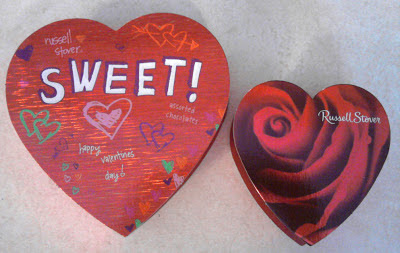
I bought a couple of heart-shaped candy boxes, with the idea of turning one of them into a velvet Conversation Heart pillbox hat. I never did find any pink velvet... Anyway, the Russell Stover boxes I got were not quite the right size. The little 3-piece box (right) was too small, and the larger box (don't remember how many pieces, but it was the next size up -- 7, maybe?) was too large. Bummer.

The larger heart is 5.5" in the longest dimension, the smaller is 4"; both are 1" deep.
The gift box (not pictured) is 4.5" and about 1.5" deep.
In my quest for pink velvet, I found a small heart-shaped gift box at Joann's for 99¢. The size was about midway between the candy boxes, sturdier, and taller. This worked out perfectly! I needed to contour the sides of the box so that it would fit more closely to my head. Basically, I shaved the sides in an arc until it felt comfortable on my head and didn't dig in. I used an X-acto knife for that.

I used pink velour to sew a cover for the box, basically making a fabric version I hoped to slip over it that would fix snugly, but when I tried it, it did not work as I'd hoped. I hot glued pink felt on the sides to cover the printed design, and to give a softer surface for the velour to cover, particularly the bottom edge of the sides that were a little uneven from my surgery of them. My second attempt was to stretch the velour over the box and glue it on the inside. I started from the front (the most visible part) and worked my way around. I did end up with two pleats at the back that I might have been able to dart to make fit better, but I was afraid to cut into the fabric at that point because I didn't have any to spare.

Contoured back and sewn up pleats.

Contoured front.

After I got the velour glued in place, I lined the inside of the box with more felt to cover the folded-over sides, and crown. I did sew the edge of the felt down; that helped me snug the velour down a little more. Once the edge was sewn, I did glue the sides. I also sewed the pleats at the back, to try and flatten them more.


I used a glossy fabric paint writer (Scribbles®) to spell out "BE MINE" on the top, after marking the letters with a tailor's pencil. Unfortunately, I still haven't gotten all the marks off from that. The lettering isn't perfect, but considering my handwriting, it's pretty fabulous.


How I'm getting it to stay on my head is a little strange, but I'll try to describe it. I bought this nifty double hair comb thingie at Target. Because of the shape of the heart, it's too wide without fussing with it a bit. I have to push the front edges closer together to allow them to be completely covered by the hat.


I wound my hair into a pretty tight bun, secured with hair sticks, then put the combs in where I wanted the hat to sit. Since it's in that bun, the hair on the top of my head makes a solid foundation for the combs to be in. With the front ends pushed closer, all I had to do was put the hat over the top of the combs and make sure that they were tucked in. Friction holds it in place! My husband took me to lunch, and with the wandering we did before and after, it's stayed firmly on my head with no slipping.

Summary:
1. Contour box to hug the shape of your head.
2. Cover box with felt.
3. Cover box with desired fabric.
4. Line inside of box.
5. Embellish.
6. Secure to your head.
7. Prepare for compliments.

BONUS HAT!

Since I had it, I used one of my smaller candy boxes to make a fascinator/headband inspired by one I saw online.


The small box is hot glued to a wide brown satin headband.


The satin ribbon covers the Russell Stover logo on the lid. But take off the lid and you will find...


Inside the box are three felt candies, glued into the paper cups. The plastic divider is glued into the bottom of the box (it melted, but that was ok), and then the candies were glued into that. The bottom of the box is covered with red felt (hiding all that silly nutritional information. I also used a red Sharpie on the edges of the box to unify the color.

It's silly and fun, and the chocolates are fairly realistic looking. Hubby actually reached out to take one (in his defense, the light was dim where I showed it to him).

So there you have it, two hats for February! Happy Valentine's Day!

Tuesday, February 12, 2013

Fits & Starts

HATS

I haven't forgotten about my February Hat! I've been working on it -- "them" actually -- but I've run into a few issues here and there that have impeded progress. I hope to have them finished today or tomorrow. They need to be done in time for Valentine's Day.

ALTERATIONS

In other news, I've decided to alter some clothes my mother made for me years ago. The jumpers that I so loved at the time are too young a style for me, and no longer fit. I'm removing the bodice to remake them as skirts. The next part is a bit trickier. I could roll the new waistband and sew in elastic, or I could make and sew on a waistband that. Easier by far to roll it, but I don't know if that's going to put too much bulk around the waist when it's gathered. The other issue with making a new waistband is that I'll have to cut material off the hem to make the casing, and I'm not sure if that will make the skirt too short. The best way (for me, YMMV) is to do one with the rolled waist and see if it works. If it does, I'm good to go on the others; if not, I'll need to look at my options. I'm also toying with dyeing one and embellishing others. I think I'll take the berets with me when I go to the store so I'll have the material with me in case I need to check colors.

MORE HATS

Two of the berets I made recently were made without a headband. For whatever reason, Mom and I decided that they didn't need them when she made the for me (to match the jumpers), so that was how I made the once I made. On a whim the other day, I cut out the band piece and sewed it on the rose beret, and what do you know, it does look better. So, I think I need to do the same for the other berets, including the ones Mom made. I can use the material from the bodices to get the band, with some creative placing of the pattern piece.

I'm planning a couple more hats, but not sure where they're going to fit into the monthly lineup. They may be bonus hats, because I'm crazy that way. I bought the material for one this morning, and in my obsessive plunder of the remnants, found some pleather... and I'm dying to dig into it. Remnants seriously rock. Not only are they discounted from what you'd pay off the bolt, but they're usually just the right amount for making a hat. A beret only takes about a half-yard, and the other hats I've made -- the toque and pillboxes -- use even less. Anyway, I didn't find much that tickled my fancy as far as embellishing the remade skirts, but it's not like I have a deadline, and I can double-check my stash.

Friday, February 1, 2013

The Milliner's Library

Free, downloadable titles

There are a number of millinery books that have been digitized and are readable online or downloaded in a variety of formats. The Internet Archive has several -- keep in mind that most of those books are quite old, dating from the 1890s to the 1920s. Also, a search of the keyword "millinery" will yield results that include socioeconomic studies of women in the trade of millinery, which you may or may not find interesting.

Millinery by Charlotte Rankin Aiken, 1922, 188 pages
Concerning Millinery, by Kate J. Giblin, 1902, 73 pages
A Complete Course in Millinery, by Julia Bottomley (ed.), revised ed. 1919, 167 pages
Complete Guide to Millinery, by Margaret Kitnzel & Mary M. Lunt, 1915, 54 pages
Home Millinery, Madame Margariete's Manual, by Margariete Creamer, 1920(?), 15 pages
Make Your Own Hats, by Mrs. Gene Allen Martin, 1921, 111 pages
Le Petit Maître, by Marie Melcher, 1895, 68 pages (despite the title, the book is in English)


Modern reprints of vintage books

Bramcost Publications has several titles -- 3 dozen at the time of this writing. I have their republication of the 1944 book, How to Make and Trim Your Own Hats by Vee Powell. They are pricey; a 23 page 8.5x11" book of crochet patterns is $14. On the other hand, finding an original vintage copy on ebay would probably run more than that. They also sell a variety of other vintage reprints, including sewing, beauty and entertaining.

 
And speaking of ebay... Dakota Prairie Treasures sells the same sort of titles that Bramcost does, spiral bound (so they'll lay flat when you're working), and in some cases, the same titles, like How to Make and Trim Your Own Hats. The prices are similar, with DPT being a bit less expensive. DPT also has some more recent titles from the '50s and '60s. They have three pages of items listed under Millinery Instruction in the shop right now. I have not yet ordered from them, so I can't comment on the quality of the reprinting, or the sturdiness of the spiral binding.

Modern millinery titles

A quick search on Amazon yields a number of modern titles. If you find a title that sounds good, but you're not certain you want to commit to the cost, check your library (or inter-library loan). Or there's always Half Price Books, Half.com (an ebay company), and ABEBooks.com -- all excellent sources of used books. You'll find some overlap between Amazon's used booksellers, Half, and ABE.

I don't currently have any of the modern books, but I did pick up a copy of Felt Jewelry by by Teresa Searle because several of the projects looked like they'd be good for millinery trimmings. Plus, I enjoy felting.


As I find titles, I'll try to review them and share my thoughts here.