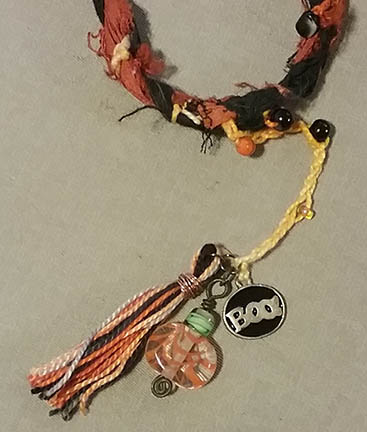
As promised in my
previous post, here are the photos of the individual bead charms. (This is photo intensive.)
The wire I used for all the bead charms is annealed steel, which is dull dark grey in color, from the hardware store. (I don't remember what gauge I
used, and I no longer have the package it came in.) It's pretty easy to
work with, has a wonderful dark/gothic/vintage look to it, and was
perfect for my Hallowe'en charms.
Many of the lampwork charms were bought at the 2008 Bead and Button show in Milwaukee, more than 10 years ago. Whatever business cards I may have collected, I have lost, unfortunately, and the beads don't exactly have signatures on them. I'll indicate where the beads came from if I recall, and who made them if I know.
There are 31 charms because there are 31 days in October, naturally.
Starting from the back and working around the silk braid.
1)
Purchased lampwork pumpkin bead (from the '08 Bead and Button show), a
metal charm from a disassembled cheap bracelet, and cotton tassel that I
made.
2)
Needle-felted ghost (
mine) and purchased lampwork bead (from the '08 B&B show).
3)
Ceramic heart with crackle glaze ('08 B&B), the orange cylindrical beads are ceramic from Greece (ebay), and the other beads are glass from my stash.
4)
Needle-felted bat (
mine) and purchased lampwork bead (from the '08 B&B show).
5)
Lampwork pumpkin bead (from the '08 B&B show), wire "vine" tendril and beaded dangle (miscellaneous glass beads from my stash).
6)
Hand-carved ceramic ghost by
Melinda Willis, glass lampwork bead (from the '08 B&B show).
7)
Lampwork bead (ebay), frame charm with miniaturized clipart from old Hallowe'en postcards and added text reading "flighty" sealed in with Diamond Glaze. Misc. black glass beads from my stash.
8)
Rolled paper bead (with Sharpie-accented edges) sealed with Hallowe'en glitter nail polish, misc. frosted glass beads from my stash, and a
mokume gane polymer clay bead that I made.
9)
Needle-felted Frankenstein's monster* (
mine) and purchased lampwork bead (from the '08 B&B show).
10)
Purchased Blue Moon Beads 2-piece cage, held together with an eye-pin, filled with orange organza ribbon, capped with acrylic "catseye" beads (all bought at Joann's or Michael's
ages ago).
11)
Two lampwork beads (from the '08 B&B show) connected with some scrolling wirework and size 6 seed beads.
12)
Needle-felted jack o'lantern (
mine) and purchased lampwork bead (from the '08 B&B show).
13)
Découpaged wooden bead with text from the dictionary ("witch"), black Greek ceramic spacers (ebay), misc. orange beads from my stash, and a witch hat charm (from the '08 B&B show).
14)
The orange half-moon and the seed beads I had already, but the three lampwork beads are from the B&B show. I tried to get a decent photo of the black cylinder; it's got orange/copper sparkles in the glass, just gorgeous.
15)
Inspired by
Macbeth (Act 4, scene 1), a tiny glass vial containing actual puppy teeth from my dog (snoring behind me). The label reads "tooth of wolf." Orange-red glass bead from my stash. Puppies usually swallow their baby teeth, and they're never found; these fell out on a tile floor and I heard them hit the floor and saved them.
16)
Polymer clay cauldron (mine) with some wirework intended to mimic a tendril of steam rising, and a charm with miniaturized vintage postcard art and added text "the witching hour" sealed with Diamond Glaze.
17)
A lampwork bead (B&B show) and a mini lotus book (from
Making Mixed-Media Art Charms & Jewelry). It was fiddly, and being paper/cardboard, more fragile than some of the other charms. There's only one of these.
18)
Needle-felted vampire (
mine) and purchased lampwork bead (from the '08 B&B show).
Middle tier:
19)
Découpaged wooden bead with text from the dictionary ("Halloween"), wirework and #6 seed beads from my stash.
20)
Needle-felted witch (
mine) and purchased lampwork bead (from the '08 B&B show).
21)
Miniaturized postcard art with added text "heady autumn" sealed with Diamond Glaze in a frame charm, and a glass crackle bead in orange and green (from Joann or Michael's, from my stash).
22)
Another
Macbeth charm, this one is "wool of bat." (It's just a bit of black wool roving, no bats were harmed in the making of this charm.) Glass beads from my stash.
23)
Three découpaged beads. The top is wooden, covered with bat-printed tissue paper, and text reading "bats in the belfry;" the middle is also wooden, covered with black and orange mulberry paper, and dictionary text for "bat;" the bottom is plastic and has a line drawing of a bat (trimmed to fit). Seed beads from my stash, black disk spacers are Greek ceramic (ebay).
24)
Spiral of wire and seed beads (from my stash) and a lampwork bead (from the B&B show).
25)
A frosted lampwork ghost (
Melinda Willis) on a ring of #6 seed beads (from my stash) and a thin copper wire pentagram.
26)
Felt bead, covered with lace hem facing and beaded (#6 seed beads from my stash). The bead was one of the ones that was... imperfect... so I covered it with lace hem facing, which disguised the flaws in the bead but still showed the colors through the lace, and stitched beads to the top and bottom as I went. It's the same kind of bead as in the center of the top tier of the necklace.
27)
Découpaged wooden bead with text from the dictionary ("ghost"), wirework and #6 seed beads from my stash.
Top tier:
28)
The last of the
Macbeth beads: this vial contains small iridescent seed beads (size 10 or 11) from my stash, labeled "eye of newt." Misc. orange and black beads from my stash.
29)
Patterned after vintage Beistle cardboard Hallowe'en cutouts, this is Shrinky Dink plastic, colored on the rough side with Sharpie Marker, découpaged with the dictionary page for "jack o'lantern" and sealed on the reverse with mulberry paper. Lampwork bead from the B&B show.
30)
Needle-felted cat (
mine) and purchased lampwork bead (from the '08 B&B show).
31)
Lampwork ghost (
Melinda Willis) on a trail of ectoplasm, purchased lampwork bead (from the B&B show).
If you like the way these charms look, I highly recommend that you seek out Peggy Krzyzewski and Christine Hansen's book, Making Mixed-Media Art Charms and Jewelry. I believe it's out of print, but finding a used copy or getting it through your library shouldn't be too hard. I love this book, I sincerely do. I wish I had more hours in the day, or another me, to make things that I get inspired by as I look through it.
_________________________
*Y'all know that "Frankenstein" was the doctor who created the monster, right? Everyone calls the monster Frankenstein, but the poor big guy with the bolts in his neck (as we know him from the movie) calls himself "Adam" to Victor Frankenstein in the book, but "the creature" is how he is most often referred. Mary Shelley: the mother of modern science fiction. Praise her name.